Running a Lemmy Instance using docker-compose
Recently Reddit made changes to it's API in an attempt to knobble third party apps (apparently stemming from concern that it's own lacklustre and ad-laden app could not compete on a level playing field). Reddit's management now seems to have moved on from lying about application developers in order to continue to threaten moderators protesting the changes.
Reddit's user and app hostile approach looks set to continue for some time and is already driving the growth of Reddit alternatives such as Squabbles.io, Lemmy and KBin.
Like many users, I've ended up creating new accounts in various places and now only really look at Reddit in order to look in on the drama or to see whether my 3rd party app is still working (which, at time of writing, it is).
I originally thought that I'd end up primarily using KBin (because I preferred the interface). That changed, though, when then the news broke that Boost will have a Lemmy compatible adaptation: Boost's interface is probably the reason that I've managed to stay on Reddit for so long - the official app would have led to me drifting away years ago.
With Boost targeting Lemmy, I decided that adopting Lemmy was likely my best long-term option, and that I would look at running my own instance (much like I do with Mastodon).
The Lemmy documentation does contain a guide to installation using docker but (IMO) it's a bit simple and lacking in examples.
In this post I'll detail the process I followed to stand up a docker based Lemmy instance, including where (and why) I deviated from the official documentation.
Contents
- Do I need to run my own instance?
- Privacy & Safety Considerations
- System Requirements
- Assumptions
- Installing Docker
- Filesystem Structure
- Enabling HTTPS
- First Configuration
- Adding Communities
- Multi-Factor Authentication
- Backups
- Updates
- Mobile Apps
- Conclusion
Do I need to run my own instance?
If you've landed here whilst searching for how to use Lemmy, please note that running your own instance is not a requirement for using Lemmy.
It's something that I (and many others) want to do, but as a user, you just need to find an instance and join that.
Privacy & Safety Considerations
It's worth saying up front: Lemmy doesn't provide for any privacy.
When you subscribe to communities from your server, that information is publicly available. Your user profile will also list which communities you are subscribed to.
So, it's well worth keeping this in mind before you get overexcited subscribing to adult communities from LemmyNSFW.
Even if it were possible to hide this subscription information, it would still be available to the other end - if your domain name identifies you, you're still linked with $niche_fetish.
On the privacy side, it's also worth noting that (just like comments), Upvotes and Downvotes are not private and are directly attributed to you under the hood.
It's not just privacy, there are also an important safety consideration here.
If you subscribe to a community that later has illegal material (such as CSAM) published to it, that content will be publicly available from your server (and domain). If the community that you've subscribed to is well moderated it will likely disappear very quickly, but if it isn't you'll potentially be unknowingly distributing it for some time.
So, before installing, it's worth being aware that there are risks associated to running even a single user instance: it might be reserved for your use, but it is by no means a private instance.
System Requirements
My instance is pretty small - I set it up using a $7/mo DigitalOcean droplet:
- 1 CPU
- 1 GB RAM
- 25GB Storage
If I end up following any image heavy communities, I'll almost certainly need to add additional storage but went through the initial setup without doing so.
Assumptions
This post makes a few assumptions
- You've already picked a domain name to use (I'll use
lemmy.example.comin this doc) - You've updated DNS to create a record pointing to your server
- You're running commands as
root(if not, prepend asudoto commands)
I deployed onto a freshly created VM, if you're adding to an existing system you may need to adjust some steps a little, I'll try to point those out when they arise, but you know your own system best.
Docker
We need both docker and docker-compose.
If you don't already have them, follow the docker install instructions for your distro of choice.
For example, on a Ubuntu server, I did
install -m 0755 -d /etc/apt/keyrings
curl -fsSL https://download.docker.com/linux/ubuntu/gpg | sudo gpg --dearmor -o /etc/apt/keyrings/docker.gpg
chmod a+r /etc/apt/keyrings/docker.gpg
echo \
  "deb [arch="$(dpkg --print-architecture)" signed-by=/etc/apt/keyrings/docker.gpg] https://download.docker.com/linux/ubuntu \
  "$(. /etc/os-release && echo "$VERSION_CODENAME")" stable" | \
  tee /etc/apt/sources.list.d/docker.list > /dev/null
apt-get update
apt-get install -y docker-ce docker-ce-cli containerd.io docker-buildx-plugin docker-compose-plugin
Finally, install docker-compose
apt-get install -y docker-compose
Filesystem Structure
We need to create somewhere for files to live.
I tend to put things like this under /usr/local/share (no particular reason, other than it being a habit I've fallen into)
mkdir -p /usr/local/share/lemmy
Then, we need to fetch some files into that directory
cd /usr/local/share/lemmy
for f in templates/docker-compose.yml examples/config.hjson templates/nginx_internal.conf
do
   wget https://raw.githubusercontent.com/LemmyNet/lemmy-ansible/main/$f
done
mv config.hjson lemmy.hjson
The files are all examples and contain placeholders (wrapped in {{ }}) indicating where information needs to be updated.
So, the next step is work through them and enter real values.
nano docker-compose.yml
Within this file, we need to do the following
- Adjust the
nginxport to"1236:8536"(we'll be changing this later) - Set the
lemmyimage:(at time of writing,dessalines/lemmy:0.18.1, but check available tags here) - Set the
lemmy-uiimage:(at time of writing,dessalines/lemmy-ui:0.18.1, but check available tags here) - Set
LEMMY_UI_LEMMY_EXTERNAL_HOSTtolemmy.example.com(replace with your domain name) - Set
PICTRS__API_KEY=to a random password - Set
POSTGRES_PASSWORDto the same password as above - Set
POSTFIX_myhostnametolemmy.example.com(replace with your domain name)
The resulting YAML should look like this
version: "3.7"

x-logging: &default-logging
  driver: "json-file"
  options:
    max-size: "50m"
    max-file: "4"

services:
  proxy:
    image: nginx:1-alpine
    ports:
      # actual and only port facing any connection from outside
      # Note, change the left number if port 1236 is already in use on your system
      # You could use port 80 if you won't use a reverse proxy
      - "1236:8536"
    volumes:
      - ./nginx_internal.conf:/etc/nginx/nginx.conf:ro,Z
    restart: always
    logging: *default-logging
    depends_on:
      - pictrs
      - lemmy-ui

  lemmy:
    image: dessalines/lemmy:0.18.1
    hostname: lemmy
    restart: always
    logging: *default-logging
    environment:
      - RUST_LOG="warn"
    volumes:
      - ./lemmy.hjson:/config/config.hjson:Z
    depends_on:
      - postgres
      - pictrs

  lemmy-ui:
    image: dessalines/lemmy-ui:0.18.1
    environment:
      - LEMMY_UI_LEMMY_INTERNAL_HOST=lemmy:8536
      - LEMMY_UI_LEMMY_EXTERNAL_HOST=lemmy.example.com
      - LEMMY_UI_HTTPS=true
    volumes:
      - ./volumes/lemmy-ui/extra_themes:/app/extra_themes
    depends_on:
     - lemmy
    restart: always
    logging: *default-logging

  pictrs:
    image: asonix/pictrs:0.4.0-rc.7
    # this needs to match the pictrs url in lemmy.hjson
    hostname: pictrs
    # we can set options to pictrs like this, here we set max. image size and forced format for conversion
    # entrypoint: /sbin/tini -- /usr/local/bin/pict-rs -p /mnt -m 4 --image-format webp
    environment:
      - PICTRS_OPENTELEMETRY_URL=http://otel:4137
      - PICTRS__API_KEY=KVFvbEzzRcfgW3nUi6TW5eFc
      - RUST_LOG=debug
      - RUST_BACKTRACE=full
      - PICTRS__MEDIA__VIDEO_CODEC=vp9
      - PICTRS__MEDIA__GIF__MAX_WIDTH=256
      - PICTRS__MEDIA__GIF__MAX_HEIGHT=256
      - PICTRS__MEDIA__GIF__MAX_AREA=65536
      - PICTRS__MEDIA__GIF__MAX_FRAME_COUNT=400
    user: 991:991
    volumes:
      - ./volumes/pictrs:/mnt:Z
    restart: always
    logging: *default-logging
    deploy:
      resources:
        limits:
          memory: 690m

  postgres:
    image: postgres:15-alpine
    hostname: postgres
    environment:
      - POSTGRES_USER=lemmy
      - POSTGRES_PASSWORD=KVFvbEzzRcfgW3nUi6TW5eFc
      - POSTGRES_DB=lemmy
    volumes:
      - ./volumes/postgres:/var/lib/postgresql/data:Z
      - ./customPostgresql.conf:/etc/postgresql.conf
    restart: always
    logging: *default-logging

  postfix:
    image: mwader/postfix-relay
    environment:
      - POSTFIX_myhostname=lemmy.example.com
    restart: "always"
    logging: *default-logging
We then need to enter some of the same details into lemmy.hjson
- Set
passwordto the postgres password set indocker-compose.yml - Set
hostname: tolemmy.example.com(replace with your domain name) - Set
api_keyto the same password - Set
smtp_from_address: tonoreply@lemmy.example.com(replace with your domain name)
This should result in something like
{
  database: {
    host: postgres
    password: "KVFvbEzzRcfgW3nUi6TW5eFc"
  }
  hostname: "lemmy.example.com"
  pictrs: {
    url: "http://pictrs:8080/"
    api_key: "KVFvbEzzRcfgW3nUi6TW5eFc"
  }
  email: {
    smtp_server: "postfix:25"
    smtp_from_address: "noreply@lemmy.example.com"
    tls_type: "none"
  }
}
At this stage, there are no changes needed in nginx_internal.conf
We do, however, need to create a directory for image storage and set permissions on it
mkdir -p volumes/pictrs
chown -R 991:991 volumes/pictrs
Now start Lemmy for the first time
docker-compose up -d
After a few seconds, it should be possible to elecit a response
curl http://127.0.0.1:1236
HTTPS
Currently, Lemmy is being served (on an awkward port) via plain HTTP. We almost certainly don't want that.
If you're deploying onto existing kit and already have a reverse proxy of some sort, you'll need to configure it to forward onto the Lemmy container and skip this section. You can find the Lemmy example reverse proxy configuration in the Lemmy Repo
If you don't have a reverse proxy, read on.
The Lemmy documentation suggests installing and running an additional Nginx instance to act as a HTTPS reverse proxy.
However, that's a little wasteful given that we've just stood up a Nginx docker container, so we're instead going to alter it's configuration so that it can be used directly.
In order to serve via HTTPS, we're going to need a SSL certificate: My initial impulse had been to use certbot, but I've thrown a bit of a tantrum this morning because Certbot requiring snapd is a deal breaker.
So, instead, we'll use acme.sh (which, if you're like me, will result in you wondering why you weren't using it in the first place).
By default, acme.sh will use /root/.acme.sh as it's install directory, but we need the docker daemon to be able to access it (to map certs into containers) so rather than having it in root's home directory, we'll install into a custom directory
cd /usr/local/share/lemmy
mkdir -p acme/acmeroot/.well-known/acme-challenge
mkdir -p acme/acmehome
Next, we fetch and install acme.sh, telling it to use the newly created directory structure
cd /usr/local/src
git clone https://github.com/acmesh-official/acme.sh.git
cd ./acme.sh
./acme.sh --install \
-m admin@lemmy.example.com \
--home "/usr/local/share/lemmy/acme/acmehome/"
Before we can acquire a certificate, we need to reconfigure nginx so that it can handle the ACME challenge requests.
To do this, we add a server block to the top of the http section within nginx_internal.conf, resulting in the file looking like this (remember to replace your domain name on the server_name line that we're adding):
worker_processes auto;

events {
    worker_connections 1024;
}

http {

    ### EDITS START HERE  ###
    limit_req_zone $binary_remote_addr zone=lemmy_ratelimit:10m rate=1r/s;

    # Redirect port 80 business to https
    # except letsencrypt challenges
    server {
        listen 80;
        listen [::]:80;

        # Set your domain
        server_name lemmy.example.com;


        server_tokens off;
        location /.well-known/acme-challenge/ {
            root /var/www/acmesh;
        }
        location / {
            return 301 https://$host$request_uri;
        }
    }

    ### BELOW THIS LINE REMAINS UNCHANGED (FOR NOW) ###

    map "$request_method:$http_accept" $proxpass {
        # If no explicit matches exists below, send traffic to lemmy-ui
        default "http://lemmy-ui";

        # GET/HEAD requests that accepts ActivityPub or Linked Data JSON should go to lemmy.
        #
        # These requests are used by Mastodon and other fediverse instances to look up profile information,
        # discover site information and so on.
        "~^(?:GET|HEAD):.*?application\/(?:activity|ld)\+json" "http://lemmy";

        # All non-GET/HEAD requests should go to lemmy
        #
        # Rather than calling out POST, PUT, DELETE, PATCH, CONNECT and all the verbs manually
        # we simply negate the GET|HEAD pattern from above and accept all possibly $http_accept values
        "~^(?!(GET|HEAD)).*:" "http://lemmy";
    }

    upstream lemmy {
        # this needs to map to the lemmy (server) docker service hostname
        server "lemmy:8536";
    }

    upstream lemmy-ui {
        # this needs to map to the lemmy-ui docker service hostname
        server "lemmy-ui:1234";
    }

    server {
        # this is the port inside docker, not the public one yet
        listen 1236;
        listen 8536;

        # change if needed, this is facing the public web
        server_name localhost;
        server_tokens off;

        gzip on;
        gzip_types text/css application/javascript image/svg+xml;
        gzip_vary on;

        # Upload limit, relevant for pictrs
        client_max_body_size 20M;

        add_header X-Frame-Options SAMEORIGIN;
        add_header X-Content-Type-Options nosniff;
        add_header X-XSS-Protection "1; mode=block";

        # frontend general requests
        location / {
            proxy_pass $proxpass;

            rewrite ^(.+)/+$ $1 permanent;

            # Send actual client IP upstream
            proxy_set_header X-Real-IP $remote_addr;
            proxy_set_header Host $host;
            proxy_set_header X-Forwarded-For $proxy_add_x_forwarded_for;
        }

        # backend
        location ~ ^/(api|pictrs|feeds|nodeinfo|.well-known) {
            proxy_pass "http://lemmy";

            # proxy common stuff
            proxy_http_version 1.1;
            proxy_set_header Upgrade $http_upgrade;
            proxy_set_header Connection "upgrade";

            # Send actual client IP upstream
            proxy_set_header X-Real-IP $remote_addr;
            proxy_set_header Host $host;
            proxy_set_header X-Forwarded-For $proxy_add_x_forwarded_for;
        }
    }
}
Next, we need to update docker-compose.yml to make the challenge directory available from within the container (whilst we're there we'll also add the certificate dir ready for use later).
In docker-compose.yml find the proxy service and:
- Update
ports: so it listens on port 80 and 443 - Add volumes for the acme data
This results in a section like this
  proxy:
    image: nginx:1-alpine
    ports:
      - "1236:8536"
      - "80:80"
      - "443:443"
    volumes:
      - ./nginx_internal.conf:/etc/nginx/nginx.conf:ro,Z
      - ./acme/acmeroot:/var/www/acmesh:ro
      - ./acme/acmehome:/certs:ro
    restart: always
    logging: *default-logging
    depends_on:
      - pictrs
      - lemmy-ui
Apply the changes
docker-compose up -d
We should now be able to write a file in and retrieve it via HTTP
echo 'Hello World!' > acme/acmeroot/.well-known/acme-challenge/hello.txt
curl http://127.0.0.1/.well-known/acme-challenge/hello.txt
Assuming we got Hello World! back, we're ready to acquire a certificate
acme.sh no longer uses LetsEncrypt as its default CA, having switched to using ZeroSSL for certs so we first need to have it register us
/usr/local/share/lemmy/acme/acmehome/acme.sh --register-account \
-m admin@lemmy.example.com \
--home "/usr/local/share/lemmy/acme/acmehome/"
Then we should be able to acquire a certificate
/usr/local/share/lemmy/acme/acmehome/acme.sh --issue \
-d lemmy.example.com \
--home "/usr/local/share/lemmy/acme/acmehome/" \
-w ""/usr/local/share/lemmy/acme/acmeroot"
It'll print output to the console, and may wait a few seconds, but should eventually finish with
[Sat Jul  8 10:31:11 UTC 2023] Your cert is in: /usr/local/share/lemmy/acme/acmehome/lemmy.example.com_ecc/lemmy.example.com.cer
[Sat Jul  8 10:31:11 UTC 2023] Your cert key is in: /usr/local/share/lemmy/acme/acmehome/lemmy.example.com_ecc/lemmy.example.com.key
[Sat Jul  8 10:31:11 UTC 2023] The intermediate CA cert is in: /usr/local/share/lemmy/acme/acmehome/lemmy.example.com_ecc/ca.cer
[Sat Jul  8 10:31:11 UTC 2023] And the full chain certs is there: /usr/local/share/lemmy/acme/acmehome/lemmy.example.com_ecc/fullchain.cer
We want the certificate to renew automatically, so need to set up a cronjob.
Create a script to trigger the process
nano cron.sh
Enter the following (replace your domain name)
#!/bin/bash
#
# Trigger cert renewal
/usr/local/share/lemmy/acme/acmehome/acme.sh --issue \
--home "/usr/local/share/lemmy/acme/acmehome/" \
-d lemmy.example.com \
-w /usr/local/share/lemmy/acme/acmeroot
Then, make the script executable and schedule to run once a day:
chmod +x cron.sh

# Run at 2 am
echo "0 2 * * * root /usr/local/share/lemmy/cron.sh" > /etc/cron.d/refresh_lemmy_cert
systemctl restart cron
With that done, we can now move onto configuring Nginx to use our newly acquired certificate.
This involves making an additional (and much more significant) change to nginx_internal.conf:
- Add a HTTPS
serverproxying onto the Lemmy containers - Remove the original Lemmy
serverblock from config (so we no longer listen on port 8536)
The resulting config is this (remember to replace your domain name, not just on the server_name lines but also ssl_certificate and ssl_certificate_key)
worker_processes auto;

events {
    worker_connections 1024;
}

http {

    ### EDITS START HERE  ###
    limit_req_zone $binary_remote_addr zone=lemmy_ratelimit:10m rate=1r/s;

    # Redirect port 80 business to https
    # except letsencrypt challenges
    server {
        listen 80;
        listen [::]:80;

        # Set your domain
        server_name lemmy.example.com;


        server_tokens off;
        location /.well-known/acme-challenge/ {
            root /var/www/acmesh;
        }
        location / {
            return 301 https://$host$request_uri;
        }
    }

    server {
        listen 443 ssl http2;
        listen [::]:443 ssl http2;

        # Set your domain
        server_name lemmy.example.com;

        # Update your domain in the paths
        ssl_certificate /certs/lemmy.example.com_ecc/fullchain.cer;
        ssl_certificate_key /certs/lemmy.example.com_ecc/lemmy.example.com.key;


        ssl_protocols TLSv1.2 TLSv1.3;
        ssl_prefer_server_ciphers on;
        ssl_ciphers 'ECDHE-ECDSA-AES256-GCM-SHA384:ECDHE-RSA-AES256-GCM-SHA384:ECDHE-ECDSA-CHACHA20-POLY1305:ECDHE-RSA-CHACHA20-POLY1305:ECDHE-ECDSA-AES128-GCM-SHA256:ECDHE-RSA-AES128-GCM-SHA256:ECDHE-ECDSA-AES256-SHA384:ECDHE-RSA-AES256-SHA384:ECDHE-ECDSA-AES128-SHA256:ECDHE-RSA-AES128-SHA256';
        ssl_session_timeout  10m;
        ssl_session_cache shared:SSL:10m;
        ssl_session_tickets on;
        ssl_stapling on;
        ssl_stapling_verify on;

        # Hide nginx version
        server_tokens off;

        # Upload limit, relevant for pictrs
        client_max_body_size 20M;
        add_header X-Frame-Options SAMEORIGIN;
        add_header X-Content-Type-Options nosniff;
        add_header X-XSS-Protection "1; mode=block";


        # Enable compression for JS/CSS/HTML bundle, for improved client load times.
        # It might be nice to compress JSON, but leaving that out to protect against potential
        # compression+encryption information leak attacks like BREACH.
        gzip on;
        gzip_types text/css application/javascript image/svg+xml;
        gzip_vary on;

        # Various content security headers
        add_header Referrer-Policy "same-origin";
        add_header X-Content-Type-Options "nosniff";
        add_header X-Frame-Options "DENY";
        add_header X-XSS-Protection "1; mode=block";


        # frontend general requests
        location / {
            proxy_pass $proxpass;

            rewrite ^(.+)/+$ $1 permanent;

            # Send actual client IP upstream
            proxy_set_header X-Real-IP $remote_addr;
            proxy_set_header Host $host;
            proxy_set_header X-Forwarded-For $proxy_add_x_forwarded_for;
        }

        # backend
        location ~ ^/(api|pictrs|feeds|nodeinfo|.well-known) {
            proxy_pass "http://lemmy";

            # proxy common stuff
            proxy_http_version 1.1;
            proxy_set_header Upgrade $http_upgrade;
            proxy_set_header Connection "upgrade";

            # Send actual client IP upstream
            proxy_set_header X-Real-IP $remote_addr;
            proxy_set_header Host $host;
            proxy_set_header X-Forwarded-For $proxy_add_x_forwarded_for;
        }

    }


    ### BELOW THIS LINE UNCHANGED ###

    map "$request_method:$http_accept" $proxpass {
        # If no explicit matches exists below, send traffic to lemmy-ui
        default "http://lemmy-ui";

        # GET/HEAD requests that accepts ActivityPub or Linked Data JSON should go to lemmy.
        #
        # These requests are used by Mastodon and other fediverse instances to look up profile information,
        # discover site information and so on.
        "~^(?:GET|HEAD):.*?application\/(?:activity|ld)\+json" "http://lemmy";

        # All non-GET/HEAD requests should go to lemmy
        #
        # Rather than calling out POST, PUT, DELETE, PATCH, CONNECT and all the verbs manually
        # we simply negate the GET|HEAD pattern from above and accept all possibly $http_accept values
        "~^(?!(GET|HEAD)).*:" "http://lemmy";
    }

    upstream lemmy {
        # this needs to map to the lemmy (server) docker service hostname
        server "lemmy:8536";
    }

    upstream lemmy-ui {
        # this needs to map to the lemmy-ui docker service hostname
        server "lemmy-ui:1234";
    }
}
One final reload:
docker-compose up -d
and the instance should be up.
Configuring the instance
Your Lemmy instance should now be accessible at https://lemmy.example.com/setup and will be prompting you to create an admin user.
Once that's done, you'll be prompted to set the instance itself up
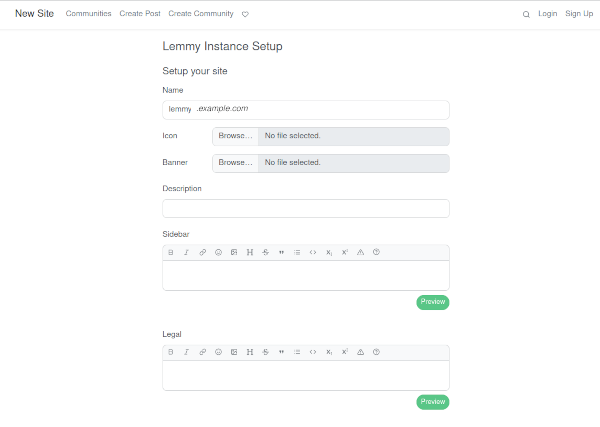
Further down the page is an option controlling registration
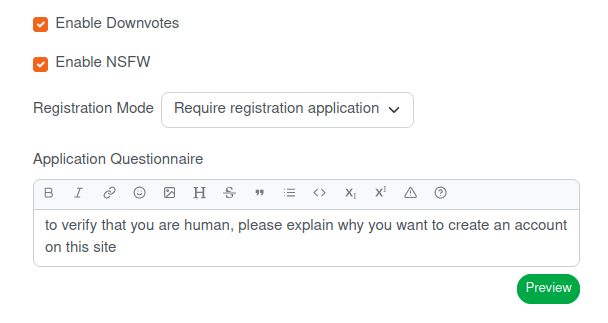
Even if you're ultimately intending to offer public registration (not something you should do lightly), you probably want to require applications whilst you get things set up.
After choosing Theming options etc, hit Create and you'll be logged into your instance for the first time

Subscribing to Remote Communities
Athough you're now logged in, it's going to feel very empty: there are no communities and no posts.
In order to get some content coming in, you'll almost certainly want to subscribe to communities on other servers.
There are two ways to do this:
- Find an instance with a community that you want to subscribe to (for example https://lemmy.ml/c/technology)
- In your Lemmy interface hit the search icon (top right)
- Paste the URL into the search bar
- Click into the result
- Hit subscribe
Or, if you already know the instance and community name, rather than going and finding the URL, you can construct it's handle using the pattern !{$community}@{$instance} (for example https://vlemmy.net/c/databreaches will be !databreaches@vlemmy.net).
You can then paste that handle into search on your instance in order to subscribe to the community
Security - 2FA
Although it doesn't prompt for it when creating the admin user, Lemmy supports TOTP multi-factor authentication, so it'd be wise to set this up if you can.
WARNING: DO NOT LOG OUT DURING THIS PROCESS
In the Lemmy interface:
- Click your handle in the top right
- Choose
Settings - Scroll to the bottom and tick
Set up 2-factor authentication - Click
Save - Refresh the page, there should now be a button labelled
2FA installation link
This button links to a URL which uses a otpauth scheme, which may allow it to open your 2FA app of choice.
That's not the case for me, if it isn't for you, the process you need to follow is this:
- Right-click the button
- Choose Copy Link
You'll now have something like this on your clipboard
otpauth://totp/lemmy.example.com:enoent?secret=ASECRET&algorithm=SHA256&issuer=lemmy.example.com
In your TOTP app you should be able to choose "Add Secret Manually" and paste the link in.
Testing 2FA
The current 2FA onboarding process is dangerous and can lead to you being locked out of your account entirely.
Lemmy uses SHA256 digests which are not supported by common TOTP apps such as Authy (my app of choice, bugger). In fact, it's unusual enough that I don't think I've come across any other service using SHA256 for TOTP yet.
Because the 2FA enablement process doesn't have the user enter a code to confirm the process worked, it's possible to think that you're set up (because the 2FA app's generating codes), only to later find that the codes are invalid.
So, it's very important that you test your codes before allowing your current session to end.
In a new browser (or incognito mode), browse to your instance and attempt to log in.
If your code isn't accepted, SSH onto your server and run
docker logs lemmy_lemmy_1
You'll likely see log lines like the following
   0: lemmy_api::local_user::login::perform
           with self=Login { username_or_email: Sensitive, password: Sensitive, totp_2fa_token: Some("200559") }
             at crates/api/src/local_user/login.rs:16
   1: lemmy_server::root_span_builder::HTTP request
           with http.method=POST http.scheme="http" http.host=lemmy.example.com http.target=/api/v3/user/login otel.kind="server" request_id=3d2239ad-42cc-4344-b4e2-bb28d2f1fc2b
             at src/root_span_builder.rs:16
LemmyError { message: Some("incorrect_totp token"), inner: incorrect_totp token, context: SpanTrace [{ target: "lemmy_api::local_user::login", name: "perform", fields: "self=Login { username_or_email: Sensitive, password: Sensitive, totp_2fa_token: Some(\"200559\") }", file: "crates/api/src/local_user/login.rs", line: 16 }, { target: "lemmy_server::root_span_builder", name: "HTTP request", fields: "http.method=POST http.scheme=\"http\" http.host=lemmy.example.com http.target=/api/v3/user/login otel.kind=\"server\" request_id=3d2239ad-42cc-4344-b4e2-bb28d2f1fc2b", file: "src/root_span_builder.rs", line: 16 }] }
In your original browser window tick Remove 2-factor authentication and hit Save.
Your options are
- Use another 2FA app
- Wait for your 2FA app to support SHA256 digests
- Wait for Lemmy to implement SHA1 digest support
If you read this warning too late and are already locked out, there's a comment on Github detailing a query to run in Postgres to remove 2FA from your account (update the username):
UPDATE local_user lu
SET
   totp_2fa_url=NULL,
   totp_2fa_secret=NULL
FROM person p
WHERE
   lu.person_id=p.id
   AND p.name='username'
Backups
Backing up a docker based Lemmy instance isn't all that different to backing up a Mastodon instance.
Files are written into the volume directory, so to backup media and the like you just need to take backups of /usr/local/share/lemmy (you may, however, want to exclude the acme directory to ensure certificate key matter isn't being sent off-server)
The Postgres database can be backed up with the following
docker exec lemmy_postgres_1 pg_dumpall -U lemmy | gzip > lemmy_postgres_backup_`date +'%Y%m%d%H%M%S'`.sql.gz`
Note that the container name may not be lemmy_postgres_1 if you've put docker-compose.yml under a different path (docker ps will give you the correct name)
Updates
Updating to a new version is just a case of
- Taking a database backup
- Updating image tags in
docker-compose.yml - Running
docker-compose up -d
For example, the release notes for 0.18.2 can be found here.
Mobile Apps
The official Lemmy App for Android is Jerboa. Apple users have Mlem.
I found the initial Jerboa experience a little jarring because it's not immediately obvious how to log in and hitting most of the buttons results in you being told to log in first.
At the top of the burger menu is the word Anonymous with a downward arrow
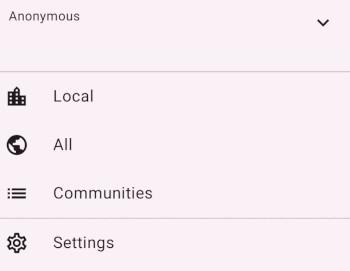
Although the menu option looks like it's already expanded, it is not - tapping the arrow results in the menu sliding down to reveal an Add Account option which takes you to the login form

Once you've got past that though, the app delivers what should feel like a very familiar feel for those used to browsing Reddit.
Conclusion
Getting a Lemmy instance up and running is pretty straightforward, it really doesn't take much to get a working system up ready for use.
There are a few potential pitfalls for users (that 2FA issue is particularly nasty) but once accounts are setup it's largely just a case of finding communities to subscribe to.
Running a personal Lemmy instance does require understanding and acceptance of some privacy and safety risks. Although Mastodon's default config presents similar risks, it has controls which can be used to help to mitigate the issue.
Although Reddit's current course is regrettable, it was probably inevitable, even though the changes could (and should) have been made in a more controlled manner, and without /u/spez resorting to lying to and about app developers. It really is the rampant shit-headery that makes it so hard to respect Reddit management's position.
Much like with the Twitter implosion, the short-term is likely to be an uncomfortable time for users as they find the userbase fragments across alternatives. In the long run, though, that lack of centralisation will likely prove to be a benefit.