Collecting data from a Bip 3 Smartwatch with Gadgetbridge, Nextcloud and InfluxDB

A few weeks ago, I wrote about how I was fetching health data from Zepp's API in order write data collected by my Amazfit Bip3 Pro Smartwatch into InfluxDB.
It hadn't originally been my intention to interact with Zepp's API, my first choice had been to pair the watch with Gadgetbridge. This would have allowed me to almost entirely avoid using the manufacturer's app. Unfortunately, I found that the Bip3 wasn't supported by Gadgetbridge and so I had to abandon that approach in favour of identifying and polling the various API endpoints called by Zepp's app.
By sheer coincidence, though, a day after I published my post, someone else ran into the same lack of support and found time to raise issue #3249 in Gadgetbridge's tracker. Within a couple of weeks, support for the Bip3 had been added.
About a week ago, people started contacting me to tell me that Gadgetbridge were in the process of adding support for the Bip, so I installed the latest nightly build and started testing.
Thanks to the work and patience of the Gadgetbridge contributors, the data that my Bip3 collects is now available to me without first needing to be sent to Zepp's servers.
In this post, I'll talk about how my new workflow automatically takes data from the Gadgetbridge database and writes it into InfluxDB for visualisation in Grafana.
Assumptions
If you are planning to run the workflow yourself, there are a few assumptions that are built into this post.
- You'll need a version of Gadgetbridge with Bip3 support, at time of writing that means that you'll need to use a Nightly release, at least until a full release has been made.
- Your smart-watch will need to have been paired with the Zepp app at least once.
- You'll need your phone to be able to reach a WebDAV target to send the database there (I'll detail how I'm using Nextcloud to achieve this later in this post)
- You'll need an InfluxDB instance - whether that's OSS, or a Cloud Account
- You'll need something to run the worker on
Workflow Overview
The workflow is actually pretty simple, with most of the work happening off-phone.
Processing has a low resource demand, so could be run on anything from a NUC to something like AWS Fargate.
- Gadgetbridge periodically exports it's database to the phone's storage
- The database is then synced to a WebDAV target
- The worker fetches the database from the WebDAV server
- The worker queries recent data out of the Huami specific tables in that database
- The worker transforms the data into time-series points
- Those time-series points are written into InfluxDB
- Data is queried and visualised in Grafana
Pairing
If you haven't already, you will first need to pair your Bip 3 with the manufacturer's app (Zepp). This is because they've introduced an authentication secret into the pairing process - you need Zepp for that secret to be set.
Note: When registering with Zepp, don't use Single Sign-On, register with an email and a password.
The Gadgetbridge Documentation details the process that you then follow to have your watch pair with Gadgetbridge.
For me, the first step in that process was to install the huami_token script:
pip3 install huami_token
I then invoked the script, passing it the credentials that I use to log into the Zepp app:
python3 -m huami_token \
-m amazfit \
-bt_keys \
--email me@example.com \
--password "mySecretPass"
The script connected to Zepp's API and fetched the secret (this is not mine, but is taken from their doc):
╓───Device 0
║  MAC: AB:CD:EF:12:34:56, active: Yes
║  Key: 0xa3c10e34e5c14637eea6b9efc06106
╙────────────
From there, the process was pretty simple
- Force stop or uninstall the
Zeppapp - Start Gadgetbridge
- Tap the
+to add a device - Wait for the Bip to be listed
- Long press on it
- Scroll down to
Auth keyand tap it - Enter the Key that the script provided
- Go back
- Tap the device name and it should pair
Once it's been paired, you'll probably want to enable things like heart-rate monitoring. Tap the settings cog in the device's card and work through each of the listed options until the watch is configured the way that you want.
You'll also want to re-create any alarms that you had set on the watch - you can do this in Gadgetbridge or on the watch itself.
Phone Configuration
With my watch paired to Gadgetbridge, the next step was to configure my phone so that it would export and push Gadgetbridge's database somewhere that my script could actually access it.
Gadgetbridge has a feature called Auto export, which does exactly what it says on the tin: it periodically writes a copy of its database to a pre-defined location:

With Gadgetbridge happily exporting it's data, it was then just a case of having the database pushed off the phone to some kind of rendezvous point.
I use Nextcloud quite extensively and so already had the Nextcloud app on my phone. As a result, when I first set Gadgetbridge's export up, I found that my phone presented Nextcloud as a network destination:
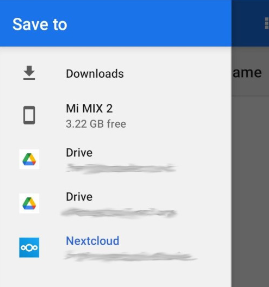
Using this led to files being passed directly into Nextcloud, which worked fine during testing but I ultimately ran into trouble as a result of an export trying to run whilst I had no reception.
To prevent a recurrence of that issue, I reconfigured Gadgetbridge so that it would write its exports into my phone's internal storage and then configured the Nextcloud app to automatically upload anything written into the parent directory (Settings -> Auto upload)
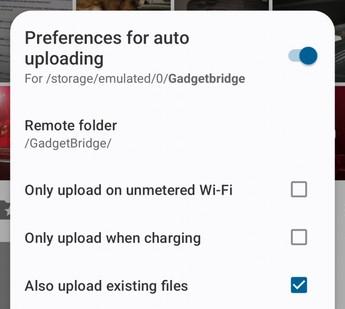
The most crucial setting in the dialog is at the very bottom:

This needed to be set to overwrite the server's copy because Gadgetbridge will be updating the local copy regularly.
With that, my phone started periodically sending copies of the Gadgetbridge database to my Nextcloud server.
It's worth noting that, as simple as setup is, there is a little bit of potential for trouble here. Auto upload worked quite reliably on my old phone, but shortly after a change of phone I ran into a few issues with it. It seems quite likely that this is the cause of those issues (Removing and regranting file access permissions seems to have unblocked it).
Nextcloud Config (Optional)
Aside from having a working Nextcloud server, there wasn't any special configuration that was actually required on the Nextcloud side.
However, I didn't feel comfortable with the idea of my Nextcloud credentials being sat in a configuration file somewhere, so I decided to set up a service user for the fetch script to use. This allowed me to restrict the files that could be accessed if those credentials were somehow compromised.
There were a few steps involved in setting this up.
First, as an admin, I created the user:
- Clicked the avatar/initial in the top right of the web interface
- Clicked
Users - Clicked
New User(top left)
This presented the user-creation dialogue

Having created the user, I started a new browser session and logged into the newly created account and then
- Clicked the avatar in the top right hand corner
- Selected
Settings - Selected
Sharing(on the left)
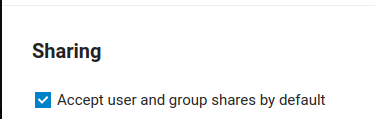
This took me to the sharing preferences for my service user. At the bottom of the page was a checkbox labelled Accept user and group shares by default.
I enabled this so that I wouldn't need to log into the service account every time I wanted to make a new location available to it.
All that remained then, was to actually share the location with the user.
I logged back into Nextcloud as me, browsed to the Gadgetbridge directory and clicked the share icon, opening a side pane

I started typing Service User into the textbox and clicked my new user's name when it was suggested.
With that, the service account had access to the Gadgetbridge directory and only the Gadgetbridge directory.
Retrieving and Processing
In normal operation, files in Nextcloud are accessed by means of a syncing agent: a dedicated process which fetches files from the server and writes them into a local directory as well as syncing any changes back and forth.
However, Nextcloud also has WebDAV Support (in fact, I've even written about it previously), which allows authenticated access to files without needing to run a separate agent.
This, of course, is perfect for the needs of a data processing pipeline: an ephemeral container can connect to the server and fetch a copy of the data that it needs without having to maintain any kind of presence, let alone state, between runs.
As an additional bonus, fetching data from a WebDAV server is absolutely trivial in Python:
from webdav3.client import Client

# Set credentials
webdav_options = {
    "webdav_hostname" : "https://nextcloud.example.com/remote.php/dav/",
    "webdav_login" : "myuser",
    "webdav_password" : "mypass"
    }

# What will the file be on the dest server?
rpath = 'files/service_user/GadgetBridge/gadgetbrbridge'

# Where should we save is?
lpath = '/tmp/gadgetbridge.sqlite'

# Instantiate the client
webdav_client = Client(webdav_options)

# Download the file
webdav_client.download_sync(
    remote_path=rpath,
    local_path=lpath
)
The Gadgetbridge database itself is a SQLite3 database, so querying that is equally trivial:
import sqlite3

conn = sqlite3.connect(f"/tmp/gadgetbridge.sqlite")
cur = conn.cursor()

res = cur.execute("select _id, NAME from DEVICE")
for r in res.fetchall():
    print(r)
Constructing points and writing them into InfluxDB is no more complex:
import time
from influxdb_client import InfluxDBClient, Point
from influxdb_client.client.write_api import SYNCHRONOUS

org = "ffff0000"
bucket = "my_data"

# Instantiate the client
client = InfluxDBClient(
    url = "https://myserver.example.com/",
    token = "SSdkIGhhdmUgY2hlY2tlZCB0b28=",
    org = org
)

# Get a write api handle
write_api = client.write_api()

# Build a point
p = Point("my_measurement")
p = p.tag("system","Deep Thought")
p = p.field("answer", 42)
p = p.time(time.time()

# Write into the database
write_api.write(
    bucket,
    org,
    p
)

# Close the handle
write_api.close()
So it was just a case of putting each of these building blocks together in order to build a containerised script capable of fetching and querying the Gadgetbridge database, before writing data onwards into InfluxDB.
At time of writing, the script is at v0.4 and is able to:
- Capture Heart Rate
- Capture Stress
- Capture Watch battery level
- Capture Activity Intensity
- Capture PAI Score information
- Capture Activity Intensity
- Capture Manual Blood Oxygen (SpO2 reads) - requires enabling of experimental features
- Calculate non-sleep stress (see here for why)
- Calculate time since last sync
- Enable calculation of time spent at different stress levels
Invocation
At it's simplest, the script can be run without a container at all:
pip install webdavclient3 influxdb-client

export WEBDAV_URL=https://nextcloud.example.com/remote.php/dav/
export WEBDAV_PATH=files/service_user/GadgetBridge/
export WEBDAV_USER=service_user
export WEBDAV_PASS=mysupersecretpassword

export INFLUXDB_BUCKET=telegraf
export INFLUXDB_URL=http://192.168.6.93:8086
export INFLUXDB_MEASUREMENT=gadgetbridge

python3 ./app/gadgetbridge_to_influxdb.py
Or, it can be run using the Docker container:
docker run --rm \
-e WEBDAV_URL=https://nextcloud.example.com/remote.php/dav/ \
-e WEBDAV_PATH=files/service_user/GadgetBridge/ \
-e WEBDAV_USER=service_user \
-e WEBDAV_PASS=mysupersecretpassword \
-e INFLUXDB_BUCKET=telegraf \
-e INFLUXDB_URL=http://192.168.6.93:8086 \
-e INFLUXDB_MEASUREMENT=gadgetbridge \
bentasker12/gadgetbridge_to_influxdb:latest
I run mine slightly differently: I've (fairly) recently moved to using Kubernetes CronJobs to trigger ephemeral workloads. This is partly because it allows me to move credential storage from configuration files to a secret store.
First, I created the secrets
kubectl create secret generic influxdbv1 \
--from-literal=influxdb_token='<redacted>' \
--from-literal=influxdb_org='<redacted>' \
--from-literal=influxdb_url='http://192.168.6.93:8086'

kubectl create secret generic nextcloud \
--from-literal=webdav_url='https://<redacted>/remote.php/dav/' \
--from-literal=webdav_user='service_user' \
--from-literal=webdav_pass='<redacted>'
Then, I defined a Cronjob with the following YAML
apiVersion: batch/v1
kind: CronJob
metadata:
  name: gadgetbridge-to-influxdb
spec:
  schedule: "0,15,45 * * * *"
  failedJobsHistoryLimit: 5
  successfulJobsHistoryLimit: 5
  jobTemplate:
    spec:
      template:
        spec:
          containers:
          - name: gadgetbridge-to-influxdb
            image: bentasker12/gadgetbridge_to_influxdb:0.4
            imagePullPolicy: IfNotPresent
            env:

            - name: INFLUXDB_BUCKET
              value: "telegraf"
            - name: INFLUXDB_MEASUREMENT
              value: "gadgetbridge"

            - name: WEBDAV_PATH
              value: "files/service_user/GadgetBridge/"
            - name: EXPORT_FILE
              value: "gadgetbridge"
            - name: QUERY_DURATION
              value: "86400"

            - name: INFLUXDB_TOKEN
              valueFrom:
                 secretKeyRef:
                    name: influxdbv1
                    key: influxdb_token
            - name: INFLUXDB_ORG
              valueFrom:
                 secretKeyRef:
                    name: influxdbv1
                    key: influxdb_org
            - name: INFLUXDB_URL
              valueFrom:
                 secretKeyRef:
                    name: influxdbv1
                    key: influxdb_url
            - name: WEBDAV_URL
              valueFrom:
                 secretKeyRef:
                    name: nextcloud
                    key: webdav_url
            - name: WEBDAV_USER
              valueFrom:
                 secretKeyRef:
                    name: nextcloud
                    key: webdav_user
            - name: WEBDAV_PASS
              valueFrom:
                 secretKeyRef:
                    name: nextcloud
                    key: webdav_pass

          restartPolicy: OnFailure
Setting it loose was then just a single command away
kubectl apply -f gadgetbridge_cron.yml
Details of the columns created can be found in the project wiki.
Graphing
With metrics being written into the database, I needed to set up a dashboard to visualise those stats.
My previous post didn't really provide an example of a dashboard because I'd tried building multiple area specific (i.e. stress, heart rate etc) dashboards rather than just the one.
I didn't particularly like that separation though so, this time, I've created a single dashboard which gives an overview of the available information

There's nothing particularly special or complex about the queries that drive this dashboard, which in part, is because of things that I learnt whilst writing the previous post.
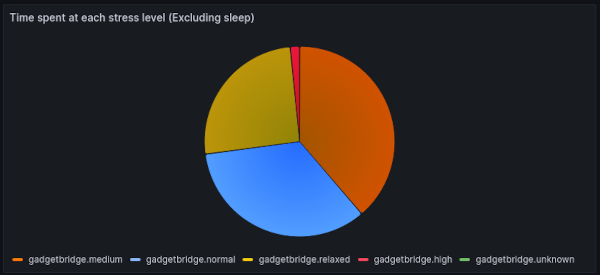
For example, when working with the Zepp data I wrote a Flux query to calculate stress proportions outside of sleeping hours:
import "date"

from(bucket: "health")
  |> range(start: v.timeRangeStart, stop: v.timeRangeStop)
  |> filter(fn: (r) => r["_measurement"] == "zepp")
  |> filter(fn: (r) => r["_field"] == "current_stress_level")
  |> filter(fn: (r) => r["stress"] == "point_in_time")

  // Exclude sleeping hours
  |> filter(fn: (r) => not contains(value: date.hour(t: r._time),
                       set: [0,1,2,3,4,5,6]))
  // Skip missed reads
  |> filter(fn: (r) => r._value > 0)

  // Turn the reads into thresholds and counts
  // the thresholds used come from the description
  // in the apps UI
  |> map(fn: (r) => ({
    _time: r._time,
    _value: 1,
    _field: if r._value <= 39
               then "relaxed"
               else if r._value >= 40 and r._value <= 59
                    then "normal"
                    else if r._value >= 60 and r._value <= 79
                         then "medium"
                         else if r._value > 80
                              then "high"
                              else "unknown"

  }))
  // Sum the values so we can get the relative proportions
  |> sum()
  |> keep(columns: ["_field", "_value"])
This time, however, because I knew I was going to want to chart this information, I shaped the data so that it could be retrieved with a simple InfluxQL query
SELECT
   sum("stress_level_counter_unknown_exc_sleep") AS "unknown",
   sum("stress_level_counter_relaxed_exc_sleep") AS "relaxed",
   sum("stress_level_counter_normal_exc_sleep") AS "normal",
   sum("stress_level_counter_medium_exc_sleep") AS "medium",
   sum("stress_level_counter_high_exc_sleep") AS "high"
FROM "telegraf"."autogen"."gadgetbridge"
WHERE  $timeFilter
This, much simpler, query still leads to the same chart:
Increasing Sync Frequency
By default, Gadgetbridge doesn't sync activity data until the user tells it to. Quite some time ago, though, a feature was added which triggers a sync whenever the phone's screen is unlocked

For Gadgetbridge centric use, this is a nice solution: you don't want your phone and watch burning battery by syncing unnecessarily regularly and if you're intending to look at metrics in Gadgetbridge, you'll probably need to unlock your screen to access it anyway.
However, that behaviour isn't quite so optimal once you start wanting to send the data onwards to an external source because you might not touch your phone at all.
I quite often browse dashboards whilst sitting with my morning coffee and so soon found that my dashboards tended to be empty in the morning: At that point of the day, I've often not actually unlocked my phone yet, so Gadgetbridge usually hadn't synced since I went to bed.
What I wanted, was for Gadgetbridge to periodically sync overnight so that there was at least some data in the dashboards the next morning.
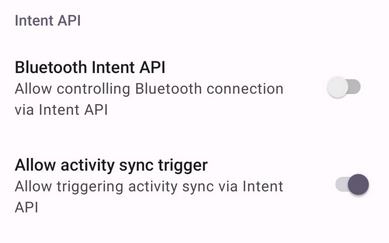
Happily, Gadgetbridge makes this easy: its Intent API includes an Intent that can be used to trigger a sync. However, this isn't enabled by default and so must first be turned on (Settings -> Intent API -> Allow activity sync trigger)
With the intent enabled, I then needed something to broadcast it on a schedule: enter Tasker. Although I last wrote about using Tasker back in 2014, it's seen periodic usage on my phone thanks to it's automation abilities (though its navigation, undeniably, still leaves a bit to be desired).
First, I created a Task (to broadcast the intent) and then created a Profile (to schedule runs of the task):
- Tap the
Taskstab - Tap the
+to add a task - Set the name to
Gadgetbridge Sync - Tap the
+to add an action - Choose
System - Choose
Send Intent - Set the Action to
nodomain.freeyourgadget.gadgetbridge.command.ACTIVITY_SYNC - Hit the Back arrow (top left)
This created a task with an action:

Hitting the back arrow again to get back to the main view, I next needed to create the Profile:
- Tap the
Profilestab - Tap the
+to add a profile - Choose
CREATE - Choose
Time - Set
Everyto 3 hours (or the desired interval) - Hit the Back arrow
- Tap
Trigger Gadgetbridge syncto link the task - Long press on the profile
- Tap the
Aicon at the top and rename toGadgetbridge Sync - Hit the tick at the top of the screen to save the profile
This created a profile which periodically triggers the intent task

With Gadgetbridge's auto-fetch also active, my watch now syncs with my phone at least once every 3 hours:

Conclusion
I'm now in a position that, just weeks ago, I thought couldn't be achieved with the Bip 3: I'm able to retrieve and write health related metrics into InfluxDB without first having to surrender them to the whims of the watch's manufacturer.
It's only right to note that none of this would have been possible without the hard work and patience of Jose on the Gadgetbridge team. Neither would I have had things built so quickly if people hadn't taken the time to tell me that Bip3 support was being added to GB in the first place. Both are massively appreciated.
Compared to collecting via Zepp's API there are currently some gaps
- Heart-rate stats and respiratory rate aren't currently supported
- There's limited support for Blood oxygen readings
- My script doesn't yet directly expose sleep data - Gadgetbridge supports it, but I've not yet dug properly into how to extract and interpret it (the script is, however writing the data onwards into InfluxDB, so historic data will be available once I've figured it out)
For me though, those gaps are outweighed by the fact that I'm no longer sending granular health related data to an unaccountable foreign company - something that, as I noted last time, I feel quite uneasy about.