Pouring a new (black) polished concrete table
A couple of years ago, I made a polished concrete table to use on our decking.
A family member really liked it, so has (quite regularly) reminded me that they'd like one if I was ever in the mood to create another.
This year, I decided that it'd make a good christmas present and so set about pouring a new table, changing my approach based on things that I learnt (or, thought that I'd learnt) last time.
In this post, I'll talk about the process that I followed to make this new table, what went wrong and what I've learnt this time around.
This post is a little unusual in that it was written as I progressed (and then scheduled for publishing after Christmas): Normally I write posts just after doing them, but given the timescales involved decided it would be better to try and write things down as I went.
Building the Form
I built the form almost exactly the same way as last time: in fact, 3 of the 4 sides were actually exactly the same wood as I used before.
The base, again, was a plywood offcut:

Although the form used, more or less, the same wood as before, this time I made a few small changes:
- The edges are screwed together: I got a slightly odd corner last time because the wood wasn't as firmly together as I thought
- The front wood is deeper, allowing for a deeper pour: I've had a corner break off the original table, so I wanted to give this one some additional depth
As before, I ran a bead of silicon sealant between the edges and the plywood.
Next, to help ensure the concrete didn't stick to it too much, I painted the wood with sunflower oil (last time I used olive oil - the change is purely because sunflower was what I had in the house)

Embedded Items
Last time, I smashed a couple of glass bottles in order to create some embeds.
Although I quite like the result:
- Bottles are curved, so the original table has (very slight) depressions in it where the glass curved away
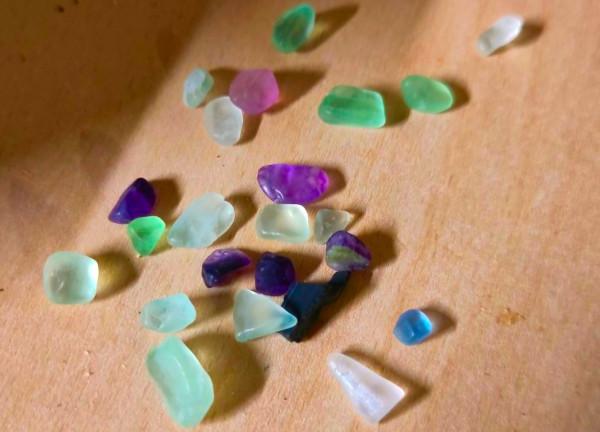
- I wanted a greater mix of colours this time
So this time, rather than chugging a beer, I ordered some crushed quartz online:
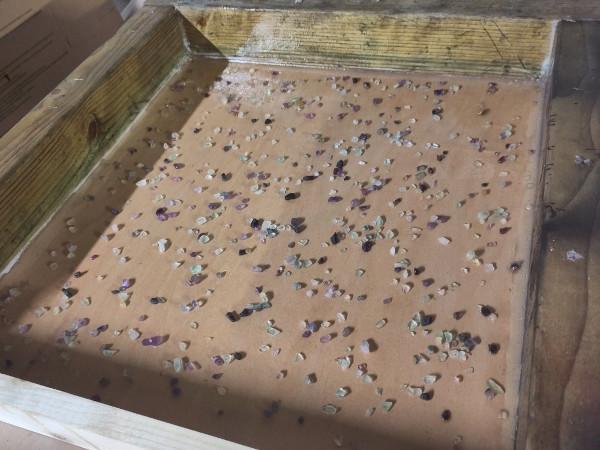
After giving the sunflower oil a little time to soak into the wood, I scattered quartz liberally over the bottom of the form.
I didn't put much effort into distribution, essentially dropping from a small height and letting it bounce to land wherever.
I did, however, move anything that landed against the sealant (and particularly in the corners) to ensure that the edge and corner of the table wouldn't be weakened by the presence of chunks of quartz
Making the Concrete
Being lazy worked out quite well for me last time, so I again ordered some ready-mix Multipurpose Concrete (although the brand I used last time was no longer available).
Because I wanted this table to be black, I also ordered some cement dye:

This stuff smells fuckin 'orrible and will quite happily dye your skin: wear gloves and try not to splash.
The dye includes a plasticiser, so it's necessary to reduce the amount of water added to the concrete to offset the dye that was added.
Now the problem with this was, I never actually measure the water that I add (and the mix that I'd bought didn't include any instructions to that effect either). I generally just add and mix until it's roughly the consistency of porridge.
So, what I did was:
- Put the concrete mix in a mixing bucket
- Add a little water
- Add some dye to the water
- Mix it in
- Add some more water
- Add some more dye to it
- Mix it in
Until I achieved the consistency that I wanted
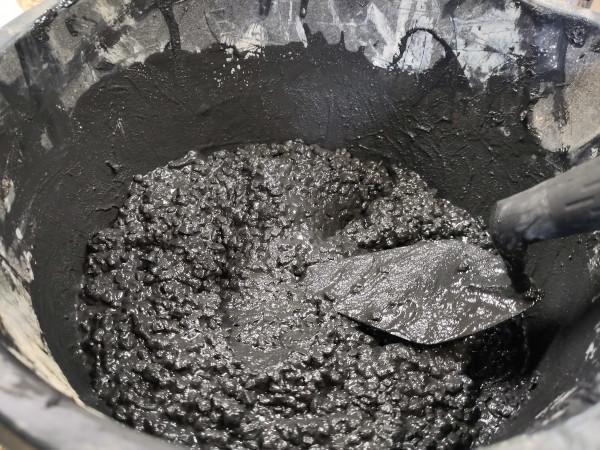
The catch with this approach is that I probably ended up adding much more dye than was strictly needed (which, I hoped, wouldn't cause any issues).
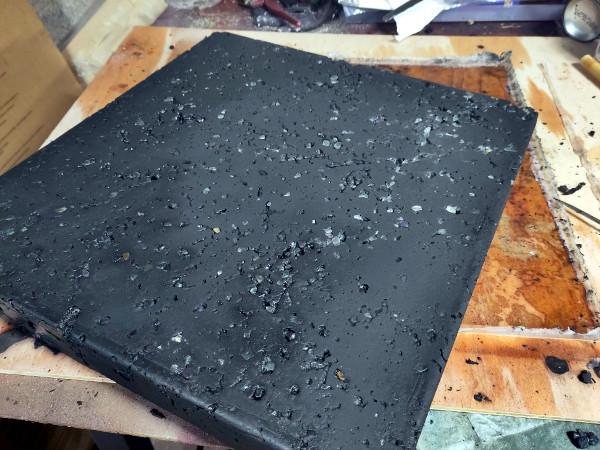
The result was some, undeniably black, concrete:
Filling the Form
Last time, I found that my bits of glass moved about when I poured the concrete into the form and noted that:
With the benefit of hindsight, I'd probably have benefited from giving it a coat of spray glue (or similar). I put some effort into making sure the glass was quite well distributed, but of course it gets moved about by the concrete when you pour it.
That was something I wanted to avoid this time. However, after thinking about it, I didn't think that spray glue was likely to be the right answer (it'd be on top of a coat of oil, so likely wouldn't set, and then would get into the concrete mix).
I also knew, from last time, that to fill the form, I'd need two buckets of concrete (the previous table used an entire bucket and this was a deeper pour).
So, I made the first bucket a little dryer than normal.
The idea was that this allowed me to more easily scoop it with a trowel, carefully dropping trowl-loads on top of the scattered quartz and (hopefully) pinning it in place.
Once I'd created the bottom layer, I carefully pushed it down with a trowl to minimise the chances of there being hidden air-gaps.
I then mixed up a second bucket of dyed concrete, this time wetter than before, so that the moisture would permeat into the bottom layer.
I then:
- Scooped and poured it on top of the first layer
- Tamped it down gently with the trowel
- Knocked the sides of the form with the handle of another trowel (to try and dislodge any trapped air)
I then carefully levelled the concrete off
At this point, I did wonder whether the top of the table might be a bit too thick, but it was too late.
I covered the form with a plastic bag (in fact, the same one as last time - it was still attached to one of the sides when I found them)

I then waited 24 hours for the concrete to set.
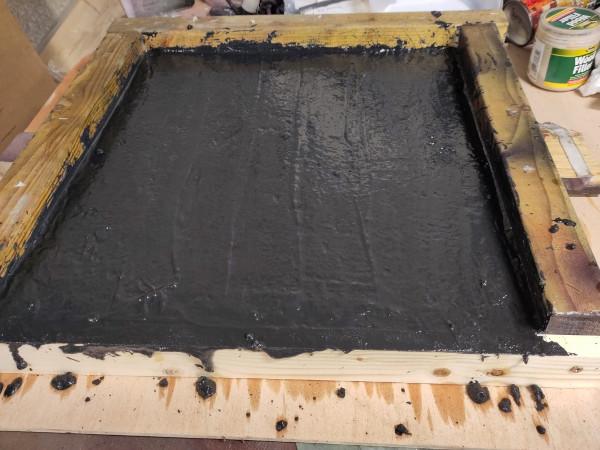
When I returned the next day, I carefully prodded the top of the concrete (fully expecting to sink into a layer of dye sludge) and found that it had set beautifully

You can see a small air hole towards the bottom right, and there are a couple of other small divots. However, the visible side will be the bottom of the table, so what really matters is that the cement had set and was solid.
Curing the Concrete
Cement sets fast, but concrete needs to cure in order to reach its full strength.
The curing process takes about a week and works best when the concrete remains properly hydrated.
So, twice daily for the next 7 days I used a spray bottle to mist the surface of the table with water:

After spraying, I covered it back up with plastic to help trap the moisture until the next spray.
The challenge with curing concrete is that you need enough, but not too much, water. If it's too dry, the concrete will crack, if it's too wet, it'll take longer to cure and the end result won't be as strong. The presence of additives can change the amount needed too.
Just to make this balance harder to strike, the level required is affected by ambient temperature and humidity. An unsettled UK October is not really the best time to have been doing this!
Generally though, it's better to be a little too wet than too dry. Over the course of the week I sprayed a total of 500ml of water onto it.
Removing the Form
After a week of waiting, it was time to remove the form and see how things looked.
So, I removed the screws from the edges and (carefully) used a hammer to knock the wooden edges away.

You can see, on the bottom edge, that there are some gaps. I wasn't overly happy with this, but unfortunately there was worse to come.
After carefully wobbling the concrete to free it from the wood, I was able to lift it and turn it over to see what the top was going to look like.
Disappointing doesn't quite cover it.
Because I'd kept the first layer quite thick (to avoid disturbing the quartz too much), the concrete hadn't really managed to get in and around some of the quartz, leaving some fairly deep air holes in places. If you look closely you can see that the top right-hand corner is in a pretty poor state too.
The concrete was also turning my hands black - the dye quite easily transferred from it to me, not really something you want happening to your tea and biscuits.
At this point, I was fairly sure that I'd need to throw it away and start again.
However, the intended recipient was due to visit within a few days: if I re-poured, I'd need to leave it out to cure, likely giving the game away.
So, I decided that, in the mean time, I'd at least try and save it. A bit of experimentation with kitchen roll showed that, after a good rub, the colour stopped transferring - so it shouldn't happen once polished and sealed.
I mixed a bag of cement with some dye and water to make a cement slop and pressed it into the surface of the table to try and make sure all the holes got filled, packed the sides and attempted to rebuild the dodgy corner

I left this to dry for a couple of days.
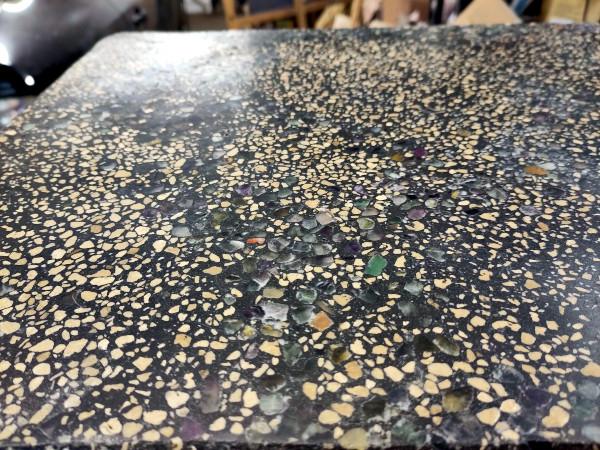
Grinding it back off revealed a pattern with serious potential, but although the original holes had been filled, there were new holes and divots.

The underlying issue here was the quartz itself. Some of the bits either weren't big enough, or weren't firmly enough adhered into the concrete and so the grinder just ripped them out of place.
At this point, it was clear: I was going to need to re-pour and start over.
However, as I couldn't repour for at least a week, I decided it made sense to continue with polishing: that way I could make and discover any mistakes on the rejected piece rather than repouring only to find (or cause) other issues.
Using the same diamond faced polishing pads as last time, I started to polish the surface. I started with a 50 grit and worked up to 3000.
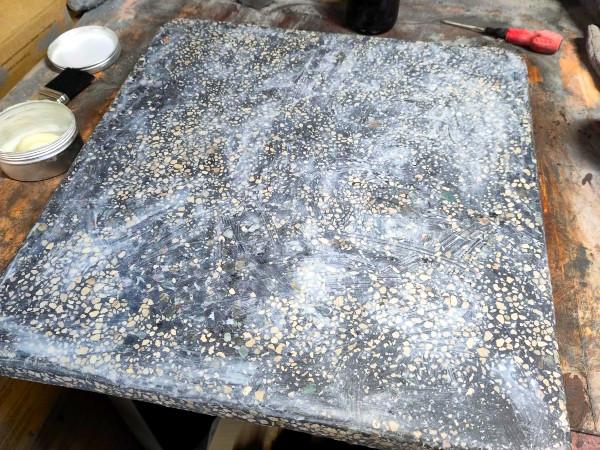
Then, I splashed some concrete sealer onto it and spread it about with a brush

The quartz stood out in more or less exactly the way that I had hoped it would.
It couldn't be used as a table-top, but could work fine as a truly unique shed front-step (or perhaps some sort of work surface).
I decided, though, that I should have another run at filling the holes in the surface. This time, I made a smooth paste (about the consistency of toothpaste) and used a small piece of wood to press it into the holes.
Once it had dried, rather than using the angle grinder to remove the excess, I jumped straight to using the 50 grit diamond pads, slowly working up and through.
I was surprised at quite how well it worked

When building my original table, I polished it by rubbing on a hard carnuba wax. However, when building my desk topper, I used a bottle of liquid wax - it was much less of a pain to apply and still polished up quite well.
So, I decided I'd try polishing the reject table-top by sponging liquid wax on:

After giving it a few minutes to dry, I buffed it away and then added another coat.
Not wanting to waste my machine polishing cloths, I buffed it by hand. The result looks much better than it photographs under the garage light

Lessons learnt
Before re-pouring, then, it was time to do a small retro and see what I'd learnt from this botched attempt.
- Sort through the quartz first and only include thicker bits
- Mix the dye with the water first, rather than adding to the cement separately
- Use a wetter mix
- Add more quartz (maybe mix some in with the aggregate in advance?)
- Don't pour quite so deep
The Re-Pour
For brevity, I won't go back over the process in too much depth, but
- I cleaned and re-assembled the form, using the front-piece that I'd used for the original table (giving a much shallower form to pour into)
- I scattered an entire bag of coloured quartz across the bottom of the form
- I mixed the dye and water in a separate bucket first
After mixing up to the consistency of a slightly overly-runny porridge, I poured into the form and left the table-top to cure for a week (spraying with water twice daily to aid the process).
After turning over, I found that we were off to a better start: I needed far less filler this time

I gave the filler a good 24 hours to cure.
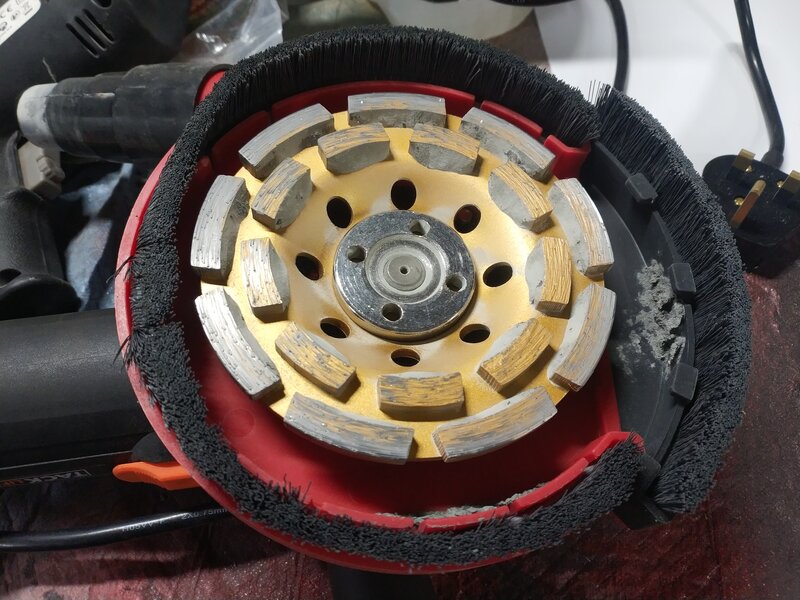
I had thought that, rather than using the angle grinder attachment to clear it off, I would jump straight to using the 50 grit polishing pad (which was less likely to rip new bits of quartz out of their seating). In practice though, that wasn't feasible - the pad kept gumming up, so I had to do a gentle skim using the angle-grinder attachment
I then worked up through each of the grits, polishing the table sides as well as the top, ultimately reaching the 3000 grit disc.
I sealed the top and sides with two coats of concrete sealer.
Although the reject had come up reasonably well with liquid wax, I decided to stick with the solid wax - the original table had achieved a finish which just wasn't present on the reject.
I applied a fairly generous layer of wax:
This, in hindsight was something of a mistake. Last time, I didn't wax the table top until after I'd fitted it to the legs. So, rather than immediately buffing, I set the waxed table top aside and set about making the legs.

I gave a fairly detailed breakdown of how I made the legs last time, so I won't go into too much depth here. Essentially, I cut 4 legs and 4 horizontal braces before attaching them to one another.
I will, however, take the opportunity to paraphrase an old high-school tech teacher: I'm a smart lad and can effectively turn my hand to a great many things. Carpentry, however, is not really one those.
What that means, in practice, is that this particular set of legs needed the aid of some filler

In this case, the root of the problem was two-fold
- I hadn't paid enough attention when using the belt-sander, so previously level ends now weren't
- I'm seemingly incapable of putting holes in the right place for a dowel joint even if I make a template first
Once the filler dried, I sanded it smooth.
With the legs assembled, I placed the slab on top of it to ensure that we were going to end up with a level table.
All seemed well, so the next step was to paint the wood.
I ran into a minor issue here. When I need black paint, I tend to use this stuff:

I had specifically set a tin of it aside ready for this project, only... it had gone missing.
It turned out that someone else in the house had wanted some black paint and had filched my stash.
On a Sunday evening, getting a new tin of paint is not exactly an option, so I had to make do with what I had on the shelf - a tin of Cuprinol Black Ash decking stain left over from when we last did our decking.

It's obvious now, but applying it to the table legs turned out to be a bit of a pain. Decking stain is meant to be spread over a horizontal surface and so, to make a tin go further, can afford to be quite runny. You can paint it onto a vertical surface, but it's a messy old job, with it lots of it running straight down.
One of the advantages of using stain rather than paint, though, is that the grain pattern still shows through:
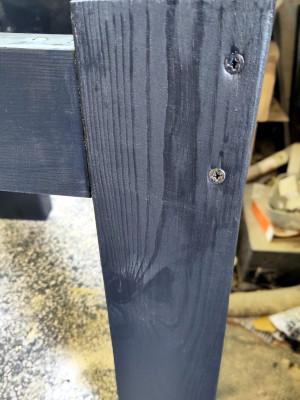
In this picture, the wood could clearly do with an additional coat of stain. One of the things that I learnt last time, though, is that the paint can get a bit scuffed whilst arranging things to stick the top on, so this time I didn't waste too much time getting it "just right" because there'd be a final coat later either way.
Before glueing the top, I first needed to re-check that it would be level, so I popped it into place and put a spirit level on top of it

It was time to glue it.
Just like last time, I used Stixall, itself an apt name, but it could equally be called fuckin-ell-thats-sticky-innit?

Clearly I should have considered a career in marketing....
Anyway, I piped some fuc... err... Stixall onto the top of the legs and then carefully sat the concrete top in place, looking around each of the edges to ensure that the top was straight and that there was - at least roughly - the same amount of concrete sticking out beyond the legs on each side.
Stixall needs 24 hours to cure, so I put some wood on top (not that the concrete really needed help to push down into the adhesive)

To try and maximise grab, I also ran a bead of Stixall around the edge of where the wood meets the concrete, wiping it smooth with a wet finger.
The next day, with the Stixall having cured, there were two jobs remaining
- A final coat of stain for the wood
- Buff the layer of wax that I'd left on the table-top
I started by buffing the wax, but the time it had taken me to progress this project caused some further issues.
Back in September 2021, when building the original table, I'd applied a thick layer of wax and then used a buffing pad on my disc sander to buff it down until it was clear and shiny.
The key word there, though, is September. I started the current table in late October and, by the time I reached the polishing stage, it was December:

Having been sat in my (uninsulated) garage, the wax was set so solid that the buffing pad just stopped spinning if even a modicum of pressure was applied.
I didn't want to risk artificially heating it - the previous table had lost it's colour when heat was applied (albeit, admittedly more heat than I'd use to soften the wax) - so I was left with the application of elbow grease.
I grabbed a polishing cloth and started firmly and slowly pulling it across the table - taking a little of the wax layer off with each stroke.
After about 30 minutes of doing this, I'd reduced the wax down enough that it was now transparent rather than white.
To try and warm/soften the remaining wax a little so that I could switch to using power tools, I gave the surface a quick (and rough) polish and then pulled the disk sander back out.
Success! It now reliably span on top of the polish, buffing it up a little. So, holding onto the top of the sander, I did my best to ignore my aching arms and instead channel the karate kid.
My fingers froze a bit from the sander's vents blowing cold air over them, but after a little time the table developed a glossy shine:
It really was quite hard to photograph in the garage - as you can see in the top right corner, there's some overhead strip lighting and the surface reflects light really easily.
Rather than being directly overhead, the light source is actually off to the left a little. This meant that, whilst buffing, I was blocking the light's direct path which made it quite hard to see how well the surface was coming up. As a result, I spent quite some time thinking that the finish wasn't really what I'd been hoping for.
With the top polished, it was time to do the same to the edges

Again, I polished a little by hand to help soften the wax and then set upon it with disc sander + buffing pad.
Finally, I gave the legs a last (and more careful) coat of stain and left it to dry.
A Confession
Before I share the result, it's time for a small confession.
We probably all know that social media can be harmful, portraying unrealistic beauty and lifestyle standards, with influencers quietly taking advantage of angles and context in order to generate an appearance of everything being perfect even when it isn't.
One of my favourite example of that is this:

It's not just social media though, pages on the internet (including this one) should not be considered immune to this, with people often preferring to show only the best outcomes.
Whilst I've been honest about the issues that I experienced along the way, there is one that (so far) has been omitted from both text and photos.
Just as an influencer only photographs their best angle, I've only been photographing the square side of the table-top:

Although, before pouring, I made sure the form was perfectly level, I didn't do such a good job of making sure I'd scraped the concrete level after pouring. The result was that one end of the table is visibly thicker than the other.
I accounted for that when measuring and cutting the legs, making the rear two legs about 7mm shorter (and so allowing the top surface of the table to remain level). That difference in leg length was probably a big contributor to me screwing up the positioning of the dowels.
When I sat the tabletop in place, I found that it sat perfectly level, but with an 8mm gap above one of the legs - hence the 8mm shim.
The Result
There was a brief break in the weather, so I was able to sit the table outside to try and capture it in natural light. I managed to take about 3 photos, on my phone, before the heavens opened again:

Hopefully, by the time that this post is published, I'll have had opportunity to take a better photo.
Conclusion
This project didn't go nearly as smoothly as my first table had. Some of that was, very clearly, my fault: my first pour of concrete was far too deep - something I should have picked up on whilst pouring.
But, I do quite like the result. My lack of care whilst pouring combined with my awful carpentry skills has created a table that could generously be referred to as quirky - something that's probably ideal for the intended recipient. I don't think I could have done it deliberately, but the result really is quite well suited.
If I ever pour another similar table, I think I'll take a chance and glue the quartz in place to try and achieve the even distribution that has eluded me so far. I do also quite like the idea of seeing whether fiber optics could be embedded in order to slightly illuminate the quartz.
What this project has really highlighted though is just how lucky I was with the first table.