Set up a Signal Proxy on Ubuntu
Signal Messenger are currently calling for volunteers to run Signal TLS Proxies in order to help people in Iran re-establish private communications despite the government's current censorship attempts.
Signal's blog post gives simple instructions on how to get a proxy up and running on a system, but assumes that you're already running Docker.
The aim of this post is to go a step further and provide instructions on getting Docker and Signal Proxy onto a freshly installed Ubuntu system. If you're on Debian, the steps are almost identical, you just need to swap ubuntu for debian in the Docker install related commands.
If you're interested in providing support, it really is a matter of minutes to get it up and running.
Using My Proxies
If you landed on this page because you were looking for a proxy to use, you can reach me in a number of ways to receive proxy details:
- DM me on Mastodon -
@ben@mastodon.bentasker.co.uk - Contact Me Page
You can also search for the hashtag #IRanASignalProxy to locate other proxy offers.
However, given Twitter's recent takeover by Elon Musk, it would be wise to consider Twitter unsafe for these kind of communications.
Ubuntu Version
This post uses this year's LTS - 22.04 / Jammy Jellyfish - but the steps should be the same on other releases.
The easiest way to get started is to get a VPS from one of the many hosting providers available - DigitalOcean, AWS, Linode, whoever best suits you - it's beneficial if proxies are spread across as wide a range of providers as possible, as it makes blocking much more disruptive and obvious.
Requirements
You will need:
- Somewhere to host the proxy (an inexpensive VPS can easily handle hundreds of connections)
- A Domain Name or Subdomain to use (Signal's proxy uses LetsEncrypt to obtain a SSL certificate, and LetsEncrypt don't issue certificates for IPs.)
- Optional: InfluxDB (or a free InfluxDB Cloud account) for system monitoring
If you don't own a domain to use (or don't want to use your own), there are ways around this - for example, using dynamic DNS services to get a free subdomain - but those are outside the scope of this post (feel free to get in contact if you want some guidance on this).
Selecting a VPS datacenter close to Iran will give lower latency, but there's probably some benefit in geo-diversity too.
DNS Setup Guidance
Once you've got a VPS running, you'll need to create a DNS record to point a name to it.
Out of an abundance of caution, you probably don't want to give it a name which discloses what the system is: don't use a subdomain called signal-proxy, for example.
Not only does it make blocking easier, but it'll lead to user's DNS lookups making them easily identifiable to anyone watching the network.
Install Docker
These instructions only differ very slightly from Docker's install instructions - they install docker-compose and git because those will be required later.
Add Repos and keys
sudo -s
apt-get update
apt-get -y install \
    ca-certificates \
    curl \
    gnupg \
    lsb-release

mkdir -p /etc/apt/keyrings

curl -fsSL https://download.docker.com/linux/ubuntu/gpg | gpg --dearmor -o /etc/apt/keyrings/docker.gpg

echo \
"deb [arch=$(dpkg --print-architecture) signed-by=/etc/apt/keyrings/docker.gpg] https://download.docker.com/linux/ubuntu \
$(lsb_release -cs) stable" | sudo tee /etc/apt/sources.list.d/docker.list > /dev/null
Update the package indexes and install
sudo -s
apt-get update
apt-get -y install \
docker-ce \
docker-ce-cli \
containerd.io \
docker-compose-plugin \
docker-compose \
git
Get and install Signal Proxy
Clone down the Signal-Proxy files
cd ~
git clone https://github.com/signalapp/Signal-TLS-Proxy.git
cd into the directory and then run the setup script
cd Signal-TLS-Proxy/
./init-certificate.sh
After some setup, this will prompt you for the domain name that you've created for the proxy - provide this.
The build process will compile NGinx, so you may see quite a lot of output scrolling by.
Eventually it'll complete and print a message like
After running 'docker-compose up --detach' you can share your proxy as: https://signal.tube/#notreal.example.invalid
Bring the system up
docker-compose up -d
The proxy is now ready for use.
You can verify that the containers are up:
docker ps
You should see three containers
signal-tls-proxy_certbot_1signal-tls-proxy_nginx-relay_1signal-tls-proxy_nginx-terminate_1
You can let people know that you've a proxy available for use by posting on Social Media with the hashtag #IRanASignalProxy. Don't post the link to your proxy publicly - they're easily searched for and blocked, ask people to DM you to request the link.
Provide users with the full signal.tube link provided in the output earlier - Signal's app has special handler for signal.tube which allows the proxy to be easily/quickly configured by the user.
Optional: Monitoring The System
The proxy doesn't demand many resources, all the same you might want to implement some basic monitoring so that you can ensure your system isn't overloaded (as this'll have a negative impact on the people most in need of it).
For avoidance of doubt, You cannot directly monitor the proxy, or the contents of the traffic it carries - it's been designed specifically to ensure that user's aren't put in a position of having to trust the proxy operator with their comms (the containers don't even generate logs).
What you can monitor is system resource usage, as well as that all three containers are up and running.
I use Telegraf and InfluxDB for monitoring, so on my proxies I've done the following
sudo -s
wget -qO- https://repos.influxdata.com/influxdb.key | tee /etc/apt/trusted.gpg.d/influxdb.asc >/dev/null
source /etc/os-release
echo "deb https://repos.influxdata.com/${ID} ${VERSION_CODENAME} stable" | sudo tee /etc/apt/sources.list.d/influxdb.list
apt-get update && apt-get -y install telegraf

# Ensure Telegraf can talk to Docker
usermod -a -Gdocker telegraf
Then in /etc/telegraf/telegraf.conf I've set
[agent]
  interval = "1m"
  round_interval = true

  metric_batch_size = 1000
  metric_buffer_limit = 10000
  collection_jitter = "0s"

  flush_interval = "10s"
  flush_jitter = "0s"

  precision = ""

  debug = false
  quiet = true

  logfile = ""

  hostname = "sig-proxy-1"
  omit_hostname = false

[[inputs.cpu]]
  percpu = true
  totalcpu = true
  collect_cpu_time = false
  report_active = false
[[inputs.disk]]
  ignore_fs = ["tmpfs", "devtmpfs", "devfs", "overlay", "aufs", "squashfs"]

[[inputs.diskio]]
[[inputs.mem]]
[[inputs.net]]
[[inputs.processes]]
[[inputs.swap]]
[[inputs.system]]

[[inputs.docker]]
  endpoint = "unix:///var/run/docker.sock"
  timeout = "5s"
  interval = "5m"

[[outputs.influxdb_v2]]
  urls = ["<my influx url>"]
  token = "<redacted>"
  organization = "<redacted>"
  bucket = "telegraf"
The stats can then be used with my existing system monitoring and alerting dashboards.
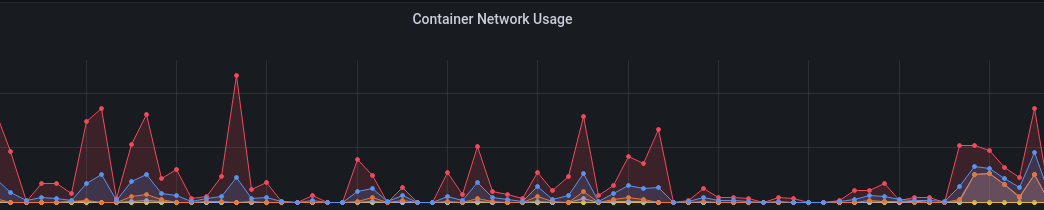
If you don't already have relevant dashboards, there are a community templates which you can import to get dashboards:
If the statistics show a prolonged drop in network traffic to the docker containers, it can be taken as an indicator that the proxy has been detected and blocked and a prompt to look at setting up under new domain names and IPs.