Making A Shelf From A Tree Trunk
When we moved into our house, there was an established plum tree in the garden, and the first harvest yielded an unbelievable number of sweet, juicy plums.
Unfortunately, it also proved to be the tree's last hurrah - after delivering the final massive bounty, it didn't sprout so much as a single leaf after that. I gave it a couple of seasons to be sure - plum trees can apparently fail to bear fruit the year after a heavy crop.
But, there was no recovery, and scratching at the bark revealed that there was no life under it. It was time to pull it out to make way for a replacement.
As much as I like a good fire, it seemed a waste to burn the entire tree - plum can be a very nice looking wood, not least because you sometimes get a nice purple vein running through it. So, while removing it from the garden, I decided that I wanted to have a go at splitting the trunk to make a shelf.
This post details the process I went through to get from tree-trunk to wall-shelf.
Choppy Choppy
Once the tree was out of the ground, I stripped the upper branches, leaving me with the roots, trunk and the base of the crown.
Here, I made life a little harder for myself: I didn't have any petrol for the chainsaw, and couldn't be arsed to run to the petrol station, so figured I'd "just" cut the roots and crown off with an axe.
It's been a while since I've needed to be particularly accurate when using an axe, and clearly my ability to aim has slipped a bit
To account for this, when chopping the crown off, I chopped higher than originally planned so that I'd later be able to use my cutoff saw to remove the evidence of my mess.

Once I had just a trunk, I moved to the workshop.
Splitting the Trunk
Tree trunks are round(ish) and round things tend to make for a poor shelves. I needed to split the trunk length ways in order to create a flat(ish) face to act as the top of the shelf.
I don't have a band-saw (as much as I try, I can't quite justify buying one), nor do I have a circular saw capable of cutting something that thickness (at least not length-ways). I decided that the best way forward was going to be to split the trunk by hand (mostly).
To give myself a headstart, I used a small circular saw to cut a slot up the length of the wood

I then worked up and down the length with a saw bit on my oscillating tool, deepening the slot as far as the bit would reach

With a slot now cut through almost to the middle, I had to decide whether to
- Hammer chisels through to split the log, or
- Try and align a second slot on the other side
The disadvantage of the first is that, while the log would split, there was no guarantee of it splitting evenly: one "half" might tear away a substantial chunk of the other. One the other hand, pounding the fuck out of a chisel with a lump hammer is fun.
The disadvantage of the second option is that it means carefully aligning the second slot with the first - harder than it sounds on an uneven lump of wood. If it's too far out, it may be quite troublesome to rectify.
I decided, though, that it was better to potentially have to sand things even than it was to risk the woord tearing itself to pieces under the strain of over-enthuisiastic chisel pounding.
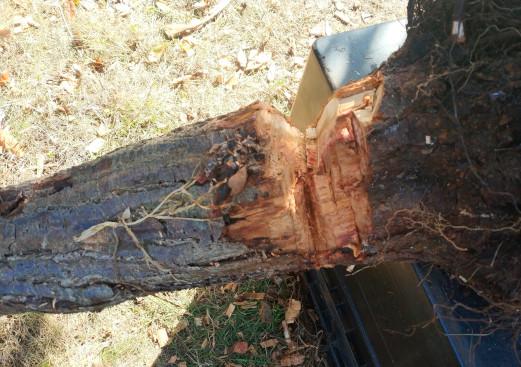
So, I flipped the trunk over and cut a new slot roughly opposite (the dodgy looking penline in the photo was used to align the edge of the circular saw's guide/guard).

It was time for some chisel bashing!
I hammered a small wood chisel in to widen the gap, and then a little further down the trunk hammered a cold chisel in.
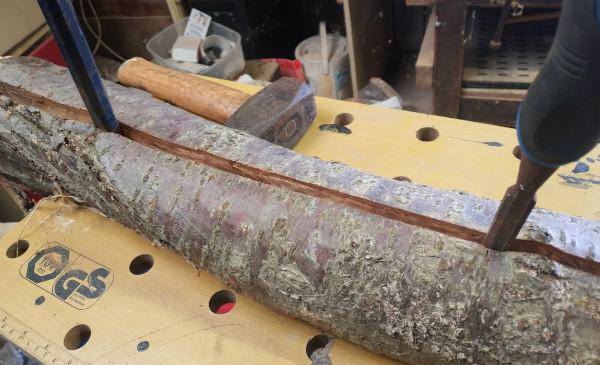
I worked my way down moving one chisel at a time, until the trunk was split into two

Sadly there was no satisfying crack or groan as it went, it peeled apart quite easily.
It was time to decide which half to work on: one side had a nice knot and it's bark was in a much nicer state, so the choice proved to be easy.
Finishing
I gave the top surface a sand, working up through the grades toward a fine sandpaper to acheive a more polished finish.
The top remained a little uneven: I didn't want to risk losing some of the patterns which were showing by completely flattening it, but did want to ensure that you could actually stand things on it (otherwise it'd be more like an art piece than a shelf).
Next, I used a cut-off saw on the ends, removing the evidence of my axe-weilding ham-fistery

(I then went back and dealt with the overhang I'd missed during sanding, visible in the picture above).
With the wood cut to length and sanded, I wanted to make the grain patterns really pop. On other shelves I've tended toward brush on varnish, but wanted to try something different.
So, instead I rubbed in some carnuba based polishing wax (it's actually intended for concrete - I bought it for finishing my poured concrete table). With just a little bit of buffing it brought the grain into sharp definition, but without overly masking the light purple traces running through parts of the wood.

Mounting
I was pretty pleased with the resulting finish, but it wasn't aactually a shelf yet: there was still the question of how to go about actually hanging the thing.
The options were
- Floating shelf brackets: the result would look much better, but a lot of care is needed when drilling holes into the wood, and a mistake could knacker the whole thing.
- A nice looking gutter hook/bracket at either end: not as nice, but easier/safer
Having had a good search around for nice looking gutter hooks, I concluded that they weren't actually a thing (in hindsight, I could probably have made some) and so ordered a set of 3 inch floating shelf brackets.
The brackets require holes in the back of the shelf to slide into, and:
- The holes need to be aligned so that the shelf is level when on the wall - tricky to measure when there is no truly flat edge on the shelf to use as a guide.
- The underside of the shelf is round, the holes need to be at a right angle relative to the top of the shelf, not to the bark
- The shelf is slightly curved along it's length, so the holes needed to angle slightly to account for it
To address the first, I drilled the first hole and then used a bracket to support the shelf over a ledge so I could use a level to help judge and mark where the second hole needed to be.

The diameter of the brackets is 10mm, so I drilled the hole with a 10mm drill bit and then jiggled it about to give a little room for play.
I failed to think of, or account for points 2 or 3 until after I'd drilled both of my 10.5mm holes (got a bit caught up in making sure the holes were drilled to give a level shelf). I still don't know exactly how I'd have gone about solving those.
Thankfully, there was enough tolerance to ensure that my oversight didn't throw things too far off, and, a couple of holes in the wall later, the shelf was up and (mostly) level

I've not quite worked out what's going to go on it yet, nor what (if anything) I want to do with the other half of the trunk, but despite having been replaced, the plum tree that was here when we moved in will continue to be a part of the house.