Wall mounting and Wifi controlling an Oil Radiator
It's that time of year again: the clocks have changed and the evenings are getting colder and darker.
Each year, when the heating first starts to kick in, I take a little bit of time to review whether there's anything that we can do better this year than last.
For the last few years, our attic room has used a smart-socket controlled portable Oil radiator as an additional heat source (I wrote about setting it up here).
However, I've never been massively comfortable with that radiator: Because the oil radiator is free-standing, it could get knocked over leading to $badness when it next automatically switches on. It could also thoughtlessly be unplugged in order to free up a socket for something else, leaving the room without the benefit it was intended to convey.
To top it off, it's also quite bulky, if it's put anywhere useful, it does tend to feel like it's getting in the way.
So, one of the things that I decided I wanted to do this year was to replace it with a wall-mounted oil radiator.
In this post, I'm going to talk about taking a new floor-standing/portable oil radiator and wall mounting it, before wiring it via a Shelly V1 Smart Relay so that it can be controlled by HomeAssistant just as the existing radiator was.
Finding a Radiator
My original intention had been to search specifically for wall mounted oil radiators, it made most sense to get something specifically made for the job.
However, it quickly became clear that finding a suitable one was going to pose something of a challenge. Screwfix had a nice long list of them, but... the prices.
As far as I can make out, the underlying issue is the 2018 introduction of Lot 20, which imposed efficiency regulations on all fixed electrical local space heaters. As a consequence of this, it looks like manufacturers, rather than worry about compliance, just stopped supplying wall-mounting brackets for their portable offerings, leaving only the premium offerings on the market.
So, where it used to be possible to pick up a £50 oil-filled radiator that came with both wheels and mounting brackets, it now is not.
This caused me something of a headache:
- The electric radiator is as a secondary heat source (so that we don't need to turn the boiler on for the sake of one room), spending £300 on that really wasn't in the plan.
- In order to achieve the necessary rating, most heaters include quite complex electrical controls (including day timers etc). These do not lend themselves well to control via the power source, because they tend to default to OFF when their power supply is restored.
- The location that I wanted to mount the radiator in is near a bed (though not dangerously so) - a 2 or 3 kilowatt heater is likely to lead to sweatiness and discomfort for anyone in the bed
So, I moved on to look for a portable oil-filled radiator that I felt I might be able to wall mount myself.
Eventually, I settled on a small 400W oil filled panel radiator:
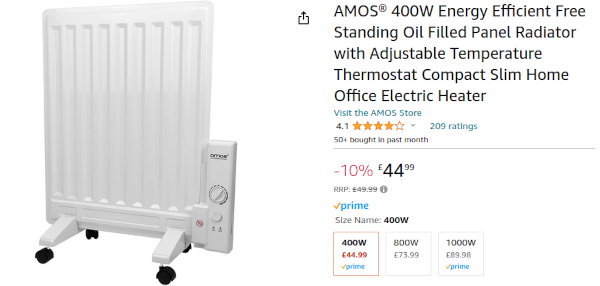
The reasoning that led to this choice was:
- It only being 400W means that it won't kick out a level of heat that'll be uncomfortable for anyone in the bed
- It's light: it's going to be mounted on a stud wall
- A panel radiator will stick out from the wall much less that an fin radiator
- The controls are simple - we can set the thermostat and then turn the supply on and off as needed
It also helped that the reviews included photos of people having previously wall mounted their purchase (prior to Lot 20, this radiator seems to have come with wall brackets).
Wall Mounting the Radiator
The next thing, then, was to look at how best to mount it.
Our existing radiators are attached to the wall with curved arms at the top and bottom - these would have been ideal, but proved all but impossible to find.
Ultimately, I settled on a set of Towel rail fixtures

The idea of these things is that you wedge one end between the towel rail's rungs and then slide it in into the base (which is screwed to the wall). Each mount is essentially two hard plastic tubes with a threaded head on one.
I obviously wouldn't be able to put the mounts through the middle of the radiator, but thought that I could have two at the bottom and two at the top.
After a little bit of frustration around finding the stud (I hate that wall, and it hates me right back), I fitted the two lower mounts just above the skirting board and then sat the radiator in place to help locate the top mounts:

Note: It's straighter and more level than it looks in this photo: I had a dead leg so just kind of took the photo and moved on before the dog could climb up on me.
Adding Wifi Control
The original oil-filled radiator was plugged into a Zigbee smart socket.
For this radiator, I decided to use a Shelly V1 wifi operated relay (in hindsight, this was a mistake: I should have gone for the Shelly V1 PWM so I had power monitoring - I may replace it at some point if it bugs me enough).
The aim was that the heater would run from a fused spur, so I also ordered a fused faceplate, with the intention of wiring the Shelly in directly after it.
The wiring for this is pretty simple:

The Shelly needs two live feeds: one to power itself and one for passing through to the output. Both the Shelly and the heater need a neutral connection and the heater needs connecting directly to earth.
Nothing is connected to terminal SW because we're not connecting an external switch - the heater has an On/Off button on it (so can already be turned off locally).
I cut and stripped the radiator's flex before pulling the wires out of a length of twin-and-earth to connect the Shelly to the back of the fused faceplate.
After passing the flex through the bottom of a 40mm surface mounted backbox, I stripped wires and connected them to the Shelly:
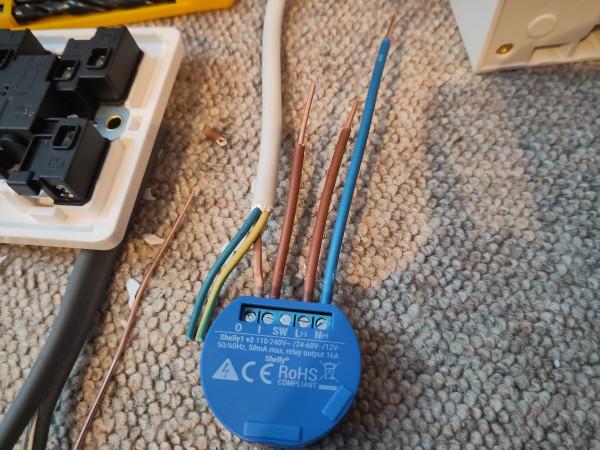
I then connected the wires to the back of the fused faceplate as follows:
Shelly L: Faceplate L2
Shelly I: Faceplate L2
Shelly N: Faceplate N2
Heater N: Faceplate N2
Heater E: Faceplate E2
The face-plate's Live and Neutral connections were shared by multiple wires (for Live: two wires from the Shelly, for Neutral: one each from heater and Shelly).
I then connected the supply on the other side of the fuse:
Supply L: Faceplate L1
Supply N: Faceplace N1
Supply E: Faceplate E1
Before powering up, I checked the fuse that came in the faceplate to see what rating it was (13A).
The heater is 400W and the Shelly, at most, will consume 1W, for a total of 401W consumption.
Watts equation tells us that Watts are calculated by multiplying voltage by current (P = V * I) , so we can use the parts that we know about to calculate the maximum expected current
I = 401W / 240V
At maximum output, we should draw 1.7A. So, for all intents and purposes, a 13 amp fuse might as well not be there.
Side note: out of curiosity, I checked what rating of fuse had been supplied in the heater's plug: it was 7A (it's really not often that you see a 7A cartridge fuse).
We were almost ready to go, so I:
- Installed a
3Afuse into the faceplate - Gave my wiring one last check
- Ensured the terminals were all tight
- Pushed it into the backbox
- Screwed the faceplate in place
Happily, there was no bang when I turned the power on.
Enabling the Shelly
When you first connect a Shelly it (quite sanely, IMO) doesn't turn the appliance on.
You first need to connect to and configure it.
The easiest way to do this is with the Mobile App, so I used that to connect to the Shelly and enrol it into our wireless network.
I was then able to use the app to turn it on for the first time:

The radiator started warming and I was ready to move onto configuring our new appliance.
The eagle-eyed amongst you may have noticed that the mounts are no longer central. This is because I decided to nudge it over slightly to avoid it getting knocked by people walking by - there's some slack in the flex behind it, so I can always move it back if the lack of symmetry annoys me enough.
Shelly Settings
There are two ways to change the Shelly's settings - via the app, or via it's built in webserver.
I found navigation in the app somewhat challenging - it's really not the most intuitive of interfaces (even down to the fact that it nags you to verify your email, but doesn't make clear where you should enter the verification code).
So, I checked my router's logs to see what IP had been assigned to the Shelly and then hit that in a web browser (http://[ip])

The Settings Menu has a number of options under it, but the main thing that I was interested in was adjusting the default state: if we have a power interruption, I want the Shelly to restore the heater to it's prior state when power returns

I also set the name under DEVICE NAME.
HomeAssistant Setup
HomeAssistant handles our heating schedules, so the next step was to add the Shelly to that.
First, I went back to my router and added a static IP for the Shelly.
The HA docs page had a button to add the integration, so I clicked that and entered my HomeAssistant URL into the prompt.
This took me to HomeAssistant's configuration, which prompted me to provide the IP or hostname of my Shelly.
When I provided that, though, I got an error:

I went back to the Shelly's Web UI, went to Settings and then chose FIRMWARE UPDATE.
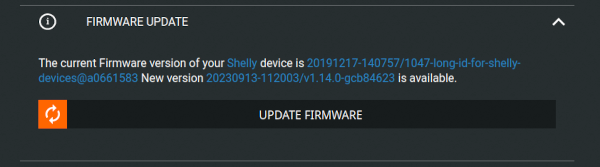
The Shelly was running an old firmware version. So I hit UPDATE FIRMWARE and about a minute later the Shelly was back with the latest version.
This time, HomeAssistant added it just fine:

I was able to toggle the heater on and off from within HomeAssistant.
Linking to a Thermostat
The original oil radiator was controlled by a Generic Thermostat in HomeAssistant, so I just edited the existing config so that heater referred to the Shelly instead
climate:
  - platform: generic_thermostat
    name: Attic Room
    heater: switch.attic_heater
    target_sensor: sensor.attic_room_temperature
    min_temp: 7
    max_temp: 21
    target_temp: 16
    min_cycle_duration: 00:05:00
    hot_tolerance: 1.0
    cold_tolerance: 0.5
    away_temp: 10
    initial_hvac_mode: "off"
    precision: 0.1
Home assistant reads temperature from the zigbee temperature sensor in that room and then, if necessary, turns the heater on and off.
In the HomeAssistant app (and web interface), the thermostat looks a little like this
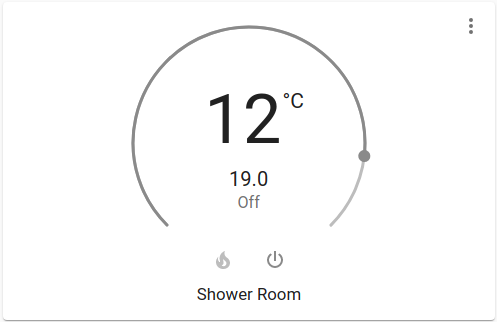
Because I'd reused the original Climate entity, there was no need to make any changes to the existing scheduling, it all just worked.
Conclusion
It took a little bit longer to get going on this than I expected. When originally thinking about this, I really hadn't anticipated just how hard it would be to find a suitable heater to screw to the wall.
I specifically wanted an oil-filled radiator because of the shape of the room - being a room-in-roof the walls aren't all that tall: I didn't really want a convector in there with so little overhead between it and the ceiling, nor did I really want to fill the room with the traditional convector dust-burning-off smell.
I did, briefly, consider a heater with built-in wifi control. However, when reading reviews of these, a common complaint is that they emit an audible beep after settings have been changed - that's not really workable for a room that might have someone sleeping in it.
Once I'd found a suitable heater though, it really was quite straight-forward: the heater rests well on the towel-rail mountings and the Shelly fit quite easily into the (admittedly quite deep) back-box.
Once the Shelly was powered up and connected to the network, it took less than 10 minutes to get everything configured.
I suspect that this heater will likely see far more use than the previous one: at 400W it's an ideal target for any excess solar energy. Having free electricity available to us via Octopus Powerup's also means that I'll be able to use the heater to help warm the room for free reducing the work that the boiler needs to do.