Repairing a Mortar Pond Waterfall
When we moved to this house, we inherited a fairly large pond full of fish - it requires a constantly running filter to ensure that their own, uh, output doesn't end up poisoning them.
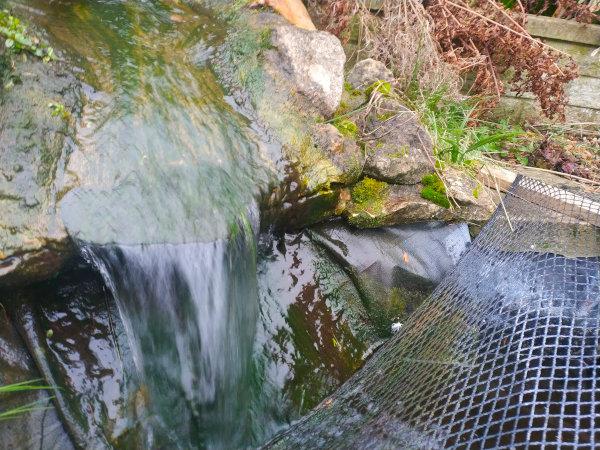
The filter's return flow reaches the pond via a waterfall, which apart from sometimes going a bit green has generally been quite low maintenance, and (caught at the right moment) helps the pond feel positively idyllic.
However, we recently found that the pond level kept dropping. The piping between pump and box-filter was checked with no sign of leak, the box filter itself wasn't overflowing and checks of the pond liner didn't reveal any holes.
Inspection of the waterfall, though, did reveal an issue:
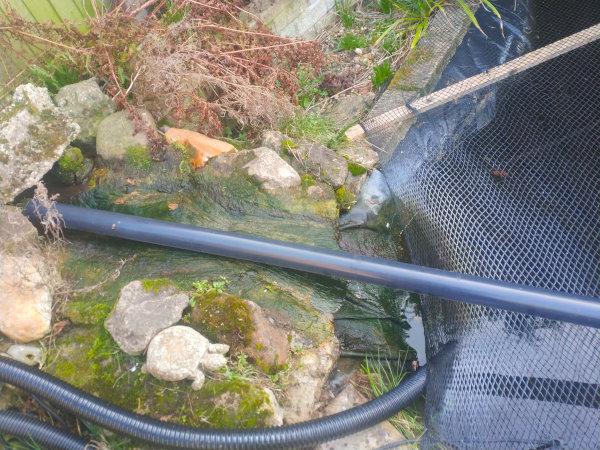
When the previous owner built the waterfall they used a roof slate for the lip.
Over time, the constant flow of water has eroded the corners off the slate until what remained snapped off (the old pump failed late last year and the new one has a slightly higher flow rate, which probably goes some way to explaining "why now").
With the slate no longer covering the full width of the waterfall, there was a flow of water down the edge of the waterfall itself escaping behind the pond liner. To add insult to injury, there was a visible gap in the edge of the waterfall, which was drawing water into the waterfall's mass, potentially escaping somewhere unseen.
Although this obviously wasn't good, it was still possible that it was not the sole leak. I didn't want to risk spending time fixing the waterfall only to later find the liner needed replacing, so, to test the impact on water loss, I ran a piece of downpipe from the top of the waterfall down to the pond
This gave the pond something of a sewage outflow vibe, but allowed me to verify that the pond's level remained the same without the waterfall in the circuit.
With the flow bypassed it was also possible to see how bad the issue actually was.
It was still cold out, so really not the best time of year to need to do work like this, but it was also something that couldn't really be allowed to wait.
In this post, I'll talk about the process I went through to stop my mortar waterfall from leaking.
Repair or Replace
The waterfall is built out of stones and mortar.
Mortar isn't the greatest material to use for waterfall construction because it's not actually waterproof. Because water can permeate it (albeit slowly) you generally lose some water through it.
It'd be logical, therefore, to argue that it'd be better to rip it out entirely and replace it with a fiberglass waterfall (or at least something with a waterproof liner).
The problem with that though, is that - by definition - the existing waterfall is a custom build. It was built into the surrounding landscaping and has a much sharper incline than most off-the-shelf offerings. Replacing it would not just mean ripping it out, it'd be necessary to re-level the ground to accomodate a commodity replacement.
In essence, we'd be re-landscaping that area: quite a big project and not one I'd feel comfortable leaping into in a rush.
The priority, really, was stopping the water loss, so I set about planning a repair.
The Repair Plan
The water loss occurred because the waterfall no longer had a meaningful lip, allowing water to run down its face rather than out and into the pond.
So, the initial repair plan was:
- Chisel out and remove what remains of the existing slate
- Install a (preferably more durable) replacement
- Fill the gaps in the waterfall face
- Skim the top with mortar to give a consistent (if somewhat industrial) look and prevent water flowing through any seams (we don't want it eroding the slate back out)
Whilst looking for a more durable option than a roof slate, I found a company selling plastic "slates"
Although I was a little concerned that they might not be rigid enough (turns out they are) it seemed likely they'd be more erosion resistant than a slate slate, extending the time until this was likely to become necessary again (by which time, hopefully, I'll have planned full replacement of the waterfall).
The Implementation
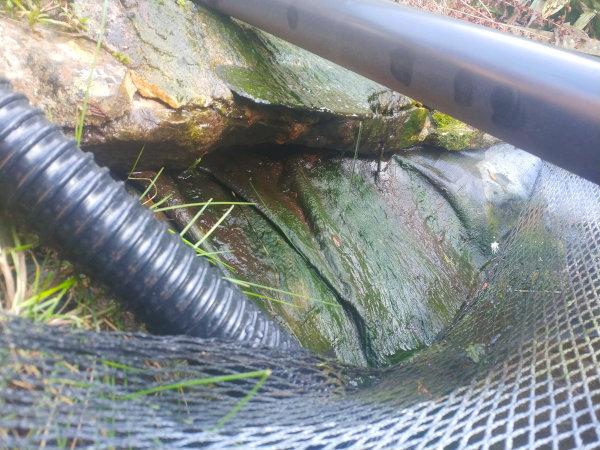
I (semi) carefully cut around the edge of the slate using a hammer and chisel and removed it

Unfortunately, as you can see, the mortar under the slate was not in a good condition: it was cracked, loose and dirt had managed to work it's way in through the face of the waterfall. There was no option but to remove it too (it didn't even really need the hammer to shift it, it just came away)

After I'd taken that picture I removed those last bits of mortar and used a wire brush to clear as much of the dirt out as possible. Then I took my slate and cut it down to size, I decided to have the lip extend a little further than the old one had.

With everything now (theoretically) ready for reconstruction, I mixed up a bucket of mortar and started to build the base back up (notice that the scaffold board is now wet, the weather forecast was wrong and I got drizzled on, sadness)
I began by filling the gap under where the slate would sit

Then I pressed the slate into position. You might have noticed that it's a little lower than when I originally offered it up: there's a rock which protrudes higher up and whilst the slate fits into the gap it prevents it from sitting level, so I moved things down a bit.
Once I'd positioned the slate I built some mortar up around it. In particular, I made sure that the mortar edges encroached upon it and were built up to help direct the flow of water onto the lip rather than allowing it to sneak out around the edges
With the threat of more drizzle (and maybe rain) looming over me, I decided that I didn't want to skim the slate only to have my work wash away, so I put the downpipe back into position to bypass the waterfall, turned the pump back on and left the mortar to harden a bit overnight overnight (sods law, it didn't actually rain after all).
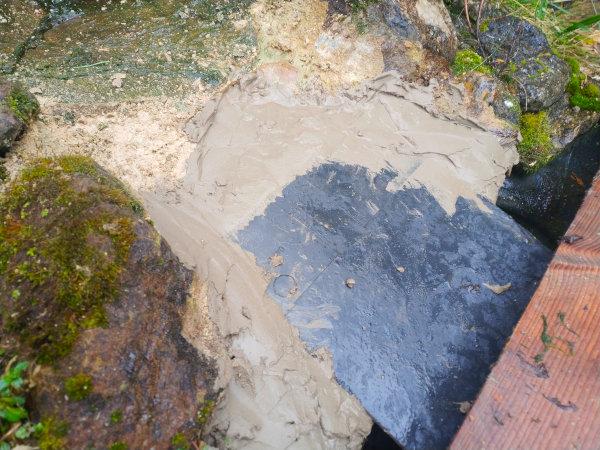
The next day, I mixed up a new bucket of mortar and skimmed the slate before filling any holes, cracks or damage in the existing mortar further up the waterfall.

It didn't exactly look appealing, but looked like it should do what was needed. I figured that the flow of water would ultimately smooth any rough edges and the sides would look better over time (nature is very good at reclaiming stuff).
I bypassed the waterfall again and gave the mortar some time to harden.
First Run
I had originally planned to let the mortar cure for a week (or maybe even two), unfortunately the weather forecast for the third day was heavy rain (which we did get), so I figured that it was better to bite the bullet so that I could be there to fish bits of mortar back out of the pond if things did go wrong.
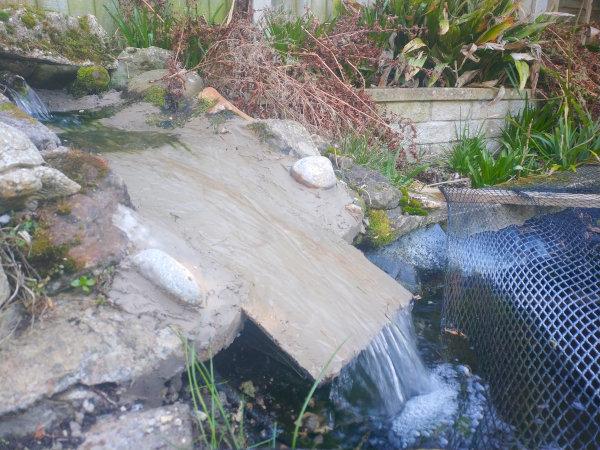
I removed the downpipe and let the water flow

There was a very slight bias towards the right corner, but the important thing was that water flowed the length of the slate rather than taking a shortcut off the side (or down the face of the waterfall).
I left the waterfall running, regularly checking the pond's water-level to make sure that it hadn't dropped. A week later, the pond's level was still consistent, so I dosed with tapsafe and started topping the pond back up (and, of course, cleared up the mess of mortar scraps I'd made in front of the waterfall).
Conclusion
Although there are good arguments for replacing the waterfall with something made from a more suitable material, that's more of a medium/long-term project and I needed to do something to stop the water loss quickly.
Repairing a mortar waterfall is quite straightforward, requiring not much more than some mortar, a break in the weather, willingness to spend time on your knees and a determination not to fall off the crawl board into the pond.
After just a week or so of running, the new sections are actually already starting to blend in a little.
It's still a fairly awful time of year to be photographing it: As we get into spring plants will start to re-emerge and frame it (and we'll emerge too in order to try and tidy the area up). The flip-side though, is that it also means that the "sore thumb" phase of the repair might actually be complete by the time anyone's actually out in the garden wanting to sit by the pond.
In case you're wondering, although it'd look better without it, the net isn't really optional because there are a lot of fish gobbling buggers around here.