Installing iRedMail on Debian (Jessie) 8
I've run my own mail server for quite some time, but it's started to reach the point where a refresh is probably in order.
Normally, I'd prefer to build from scratch, but I thought, this time, I'd have a look at some of the "off-the-shelf" solutions that now exist. Mailinabox was quickly discounted because there's no real configurability, which doesn't sit well with me (it does simplify installation, but makes long-term management that much harder).
iRedMail seems to have a reasonable following, and a scan of it's website and documentation suggested that it is, at least, reasonably sane.
This documentation details the process I followed to install iRedMail on Debian 8 (Jessie). I used Jessie rather than Stretch (9) because that's what the VM I was repurposing was imaged with.
Introduction
Once this process is complete, we'll have a server set up and running iRedMail, using the following underlying components
- Postfix
- Dovecot
- MariaDB (or Postgres if you prefer - the installer will ask)
- Nginx
- Roundcube Webmail
- Amavis
- ClamAV
- SpamAssasin
- Fail2ban
- mlmmj (Mailing list manager)
We'll also make sure the system presents a valid SSL certificate obtained from Let's Encrypt.
Pre-Setup
There are a few small bits which need doing before fetching and triggering the installer.
You should install on a freshly installed OS to reduce the likelihood of conflicts during the install process.
Firstly, we need to make sure the server has (and knows) it's Fully Qualified Domain Name (FQDN) so that it identifies itself correctly when it connects out to other mailservers.
hostname -f
sohara.sys.bentasker.co.uk
We also need to ensure that we've got BZip install so that we can expand the installer
apt-get install bzip2
Make sure the OS install didn't dump exim onto the system
apt-get remove exim4
Install
The next thing to do is to fetch the installer.
There's a slight caveat here on Jessie. IRedMail seems to have dropped support for Jessie, so a slightly older release (0.9.7) needs to be installed rather than the latest (0.9.9). This isn't ideal, but the installer appears to use apt for major components, so we shouldn't be exposed to too much risk (as we'll still be getting the latest version the repositories have).
wget https://bitbucket.org/zhb/iredmail/downloads/iRedMail-0.9.7.tar.bz2
tar xjf iRedMail-0.9.7.tar.bz2
cd iRedMail-0.9.7
bash iRedMail.sh
The installer will now run, it's safe enough to accept the defaults and the options it asks for are fairly self explanatory
The only default I didn't accept is the firewall rules, I'll create those later
Once the installer completes, your system is nominally configured as a mail server (albeit using self-signed certificates for everything)
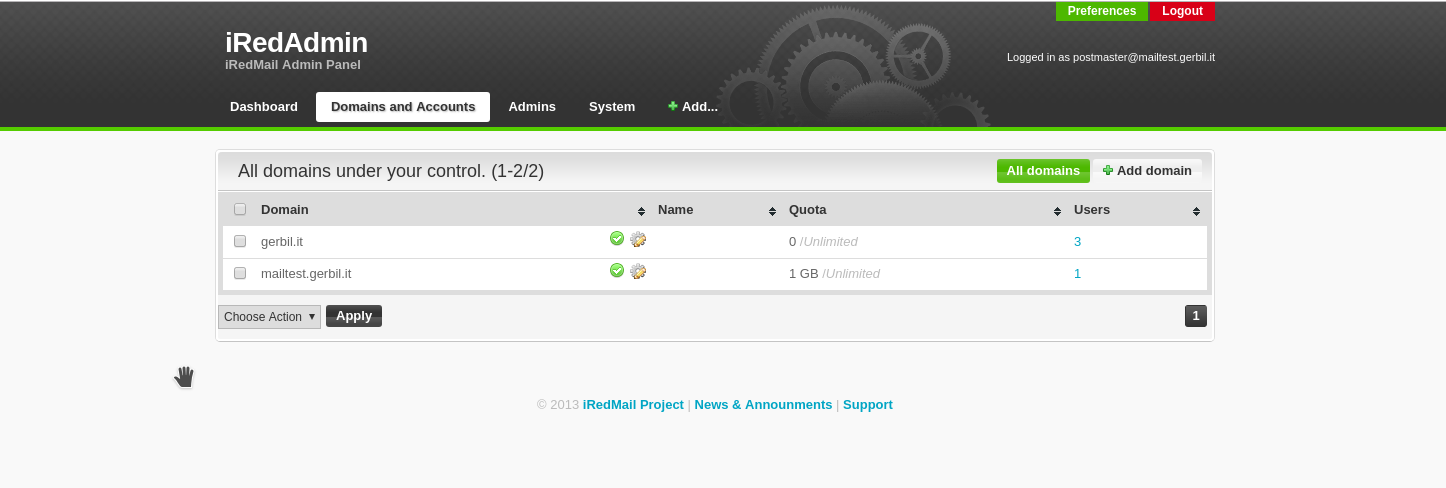
The management interfaces are available at:
- iRedAmin: https://[your domain]/iredadmin/
- Roundcube webmail: https://[your domain]/mail/
- Awstats: https://[your domain]/awstats/awstats.pl?config=web / https://[your domain]/awstats/awstats.pl?config=smtp
The admin account to use with iRedAdmin is the one you configured in the installer.
Use this to add a domain and the necessary user accounts
- "Domains and Accounts" -> Add Domain
- "Add" -> "User"
Firewall Rules
Next, we're going to create the basic firewall set. Part of the reason I've done this separately is because I have a separate admin network, so will restrict HTTPS access from the wider web (if you intend to do this, bear in mind this will also mean no web mail).
The installer has already set up fail2ban, so there will be some rules for those. What we need to add is
- Allow established connections
- Allow loopback connections
- Allow SSH
- Allow Mailserver essential connections (SMTP, IMAPS etc)
- Reject everything else
So,
iptables -I INPUT -i lo -d 127.0.0.0/8 -j ACCEPT
iptables -A INPUT -m state --state RELATED,ESTABLISHED -j ACCEPT
iptables -A INPUT -p tcp --dport 22 -j ACCEPT
iptables -A INPUT -p tcp --dport 25 -j ACCEPT -m comment --comment "SMTP in"
iptables -A INPUT -p tcp --dport 443 -j ACCEPT -m comment --comment "HTTPS" # I did this one differently
iptables -A INPUT -p tcp --dport 993 -j ACCEPT -m comment --comment "IMAPS"
iptables -A INPUT -p tcp --dport 995 -j ACCEPT -m comment --comment "POP3S"
iptables -A INPUT -p tcp --dport 587 -j ACCEPT -m comment --comment "SMTPS"
iptables -A INPUT -j REJECT
We then want to make sure that rules will persist following a reboot, so install the iptables-persistent package
apt-get install iptables-persistent
SSL Improvements
The server currently uses a self-signed certificate on all interfaces. Traditionally it wasn't unusual for mailservers to do this, but lets use LetsEncrypt so that we can present a valid certificate.
You will need to have updated DNS so that whatever name you're using for your mailserver resolves to it (I'm using mail2 below as I wasn't ready to update the MX record from pointing at mail just yet)
The first thing to do is to install certbot. To get the latest version we need to ensure the outdated Debian package isn't installed
apt-get remove certbot
Then we fetch and install certbot
wget https://dl.eff.org/certbot-auto
mv certbot-auto /usr/local/bin/certbot-auto
chown root /usr/local/bin/certbot-auto
chmod 0755 /usr/local/bin/certbot-auto
ln -s /usr/local/bin/certbot-auto /usr/local/bin/certbot
Next, we need to allow port 80 through the firewall
iptables -I INPUT 9 -p tcp --dport 80 -j ACCEPT
iptables-save > /etc/iptables/rules.v4
Now, lets give certbot a run. Remember to switch the domain for your mail domain
certbot certonly --webroot -w /var/www/html -d mail2.example.com
As it's the first run, certbot will install its dependencies, and then ask you a bunch of questions
Once it's complete, the cert and key will have been saved to
- /etc/letsencrypt/live/[your domain]/fullchain.pem
- /etc/letsencrypt/live/[your domain]/privkey.pem
Set up a cron to trigger the renewal check daily
echo "1 3 * * * root certbot renew --post-hook 'service postfix restart; service nginx restart; service dovecot restart'" > /etc/cron.d/certbot-renewNow, we want to make the various services use the new certificate, so we'll move the snake-oil one out of the way and create a symlink
cd /etc/ssl/
mv certs/iRedMail.crt certs/iRedMail.crt.bkup
mv private/iRedMail.key private/iRedMail.key.bkup
ln -s /etc/letsencrypt/live/mail2.example.com/fullchain.pem certs/iRedMail.crt
ln -s /etc/letsencrypt/live/mail2.example.com/privkey.pem private/iRedMail.key
Now, if you're comparing this to the iRedMail documentation, you may think the next step is to chmod the LetsEncrypt directory to make it world readable. Do not do that, it's completely unnecessary (the daemons read the cert before they drop privileges) and means any user on the box could compromise your private key
If we restart the services they should now use the new cert
service postfix restart
service dovecot restart
service nginx restart
We can verify this from our desktop using OpenSSL's s_client module
echo | openssl s_client -connect mail2.example.com:587 -starttls smtp
echo | openssl s_client -connect mail2.example.com:995
echo | openssl s_client -connect mail2.example.com:443
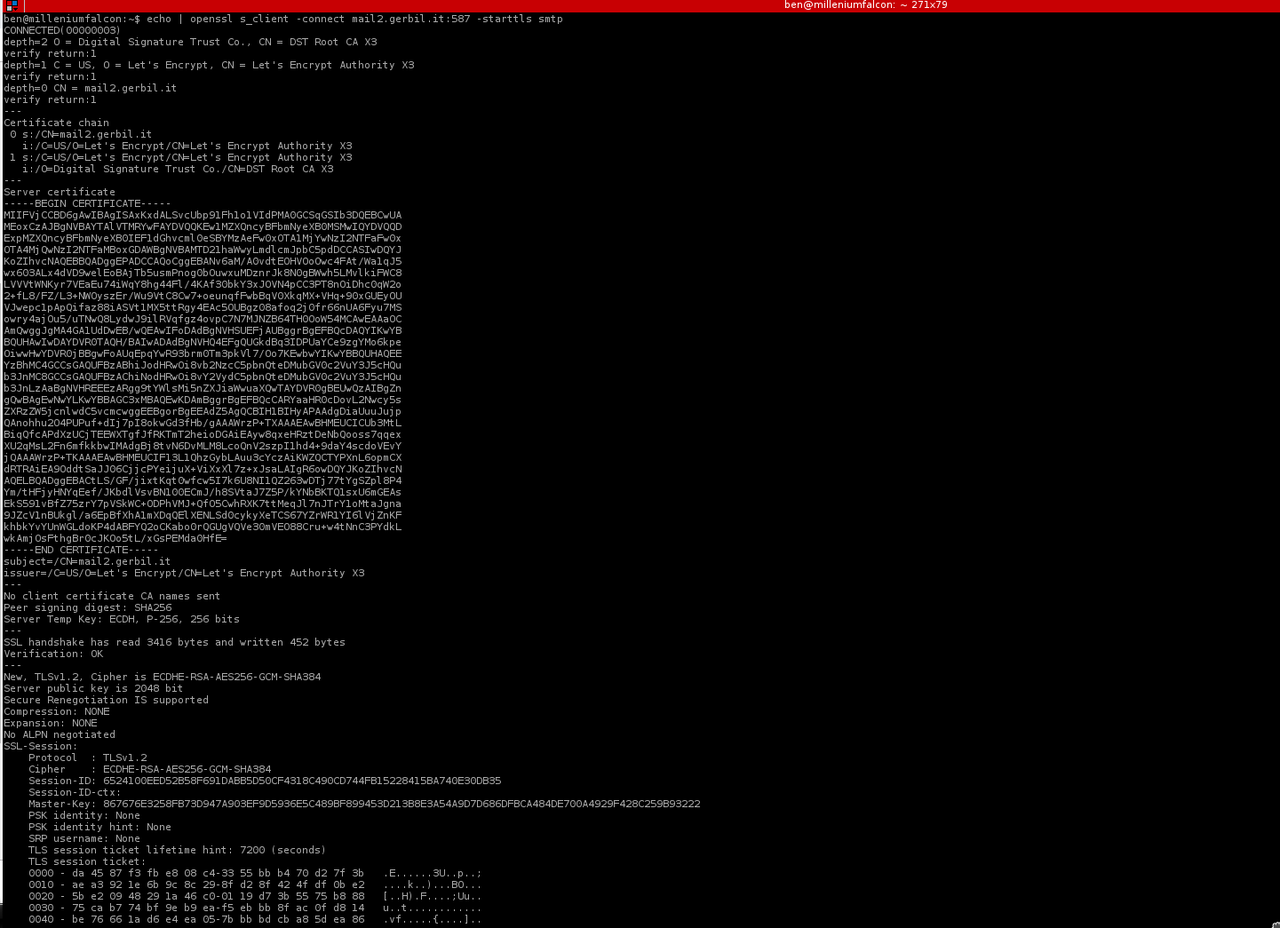
If you look at the output, you'll see some information on the certificate
subject=/CN=mail2.example.com
issuer=/C=US/O=Let's Encrypt/CN=Let's Encrypt Authority X3
What you want to check is that the Issuer is Let's Encrypt, and the Subject matches your mailserver name.
Enabling SMTPS
You may have noticed on that first openssl call that we had to tell the software to use STARTTLS in order to establish a SSL session.
This is because, by default, iRedMail doesn't ship with SMTPS enabled. The documentation notes that this is deliberate because "SMTPS is deprecated, so iRedMail disable it by default".
Whilst it's true that SMTPS is deprecated in favour of STARTTLS, various ISPs have been caught actively stripping the STARTTLS command from their customer's SMTP sessions in order to perform a downgrade-to-plain attack on the connection.
Whether SMTPS is deprecated or not, the trivial ability to perform a downgrade in this manner means SMTPS remains preferable in my book.
Enabling it is fairly straight forward
nano /etc/postfix/master.cf
# Find the commented out SMTPS line and insert this
465     inet  n       -       n       -       -       smtpd
-o syslog_name=postfix/smtps
-o smtpd_tls_wrappermode=yes
-o smtpd_sasl_auth_enable=yes
-o smtpd_client_restrictions=permit_sasl_authenticated,reject
-o content_filter=smtp-amavis:[127.0.0.1]:10026
Then restart postfix, and verify it's listening on port 465
service postfix restart
netstat -lnp | grep 465
tcp        0      0 0.0.0.0:465             0.0.0.0:*               LISTEN      17943/master
tcp6       0      0 :::465                  :::*                    LISTEN      17943/master
Allow port 465 through the firewall
iptables -I INPUT 9 -p tcp --dport 465 -j ACCEPT -m comment --comment "SMTPS"
iptables-save > /etc/iptables/rules.v4
You should now be able to connect with s_client and get a valid cert back
openssl s_client -connect mail2.example.com:465
MX Record
We now have a fully configured and functioning mail server, but it won't currently receive any mail because we either don't have an MX record configured, or (as in my case) it's still pointing at the old server.
So, our MX record needs to point to the name of our server (so that the cert is considered valid)
IN MX 5 mail2.example.com.
Once that's live (and TTLs have expired), mail should start coming into your server
You should also create or update your Sender Policy Framework (SPF) records.
Client Config
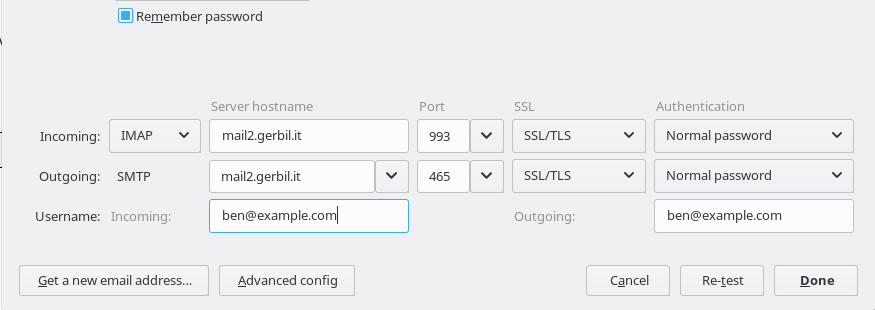
We now need to configure our mail clients so they can actually use the server (assuming you're not intending to just use the webmail)
Server: your server
User: ben@example.com
Receiving
- IMAP: SSL/TLS port 993. Auth PLAIN/Normal Password, or
- POP3: SSL/TLS port 995. Auth PLAIN/Normal Password
Sending:
- SMTPS: SSL/TLS port 465. Auth PLAIN/Normal Password
Conclusion
iRedMail quickly provides you with a functional, and reasonably feature complete mailserver fairly quickly.
Apart from the exclusion of SMTPS (which, to be fair, is well rationalised in their documentation) and an utterly insane step in their LetsEncrypt guide, the installation seems to be reasonably sound by default.
I am a little concerned about the iRedAdmin interface - not only am I running an older version (because of support for Debian oldstable being dropped), but the installer also installs PHP 5.6 which is technically EOL (although Debian do backport security fixes, so it's not quite as severe as it sounds).
That said, because I have an admin network available, I do have the advantage of being able to segregate that interface away from the network.
Time will tell what iRedMail is like for ongoing maintenance (installing upgrades does look like it might be a pain), but given it's underpinned by software that I was already using (Postfix, Dovecot) it shouldn't be the end of the world if (as an extreme) I find that the server needs to have the iRed* bits of it removed.
Additional
Disabling Greylisting
Greylisting is a technique used to deter spam by slightly delaying mail from domains/servers that haven't been seen before. The general principle is that our mailserver will reject mail from "new" servers for an hour.
Sending mailservers that are compatible with RFC 821 will retry later and the mail will be accepted, whereas most spam bots won't bother retrying and the spam won't be received.
The problem with greylisting, like all anti-spam defences, is it does mean there's a risk of "real" mail getting lost (or, at the very least, delayed). With this mailserver, I place more priority on ensuring mail is actually received, so decided to disable greylisting:
nano /opt/iredapd/settings.py
# locate "plugins" and remove greylisting from it
service iredapd restart
However, there is an alternative to this, which is to switch the greylisting plugin into training mode (so that it'll sit and learn about servers you commonly hear from, without actually rejecting anything)
nano /opt/iredapd/settings.py
# Add the following
GREYLISTING_TRAINING_MODE = True

systemctl restart iredapd
You can then periodically check which domains it knows about using the greylisting admin plugin. Details on how to use it are here.
Mbox Import
My old mailserver uses MBox format storage, whereas iRedMail uses Maildir, so in order to import my mailboxes I first needed to configure them.
On a Ubuntu desktop, I copied the Mbox down from my old server and then did
apt-get install mb2md
mb2md -s /tmp/user.example.com
scp -r ~/Maildir/ sohara:/tmp/

# On the mailserver, move into location
mv /tmp/Maildir/cur/* /var/vmail/vmail1/example.com/u/s/e/user-2019.05.25.12.23.36/Maildir/cur/
mv /tmp/Maildir/new/* /var/vmail/vmail1/example.com/u/s/e/user-2019.05.25.12.23.36/Maildir/new/
chown -R vmail:vmail /var/vmail/vmail1/example.com/u/s/e/user-2019.05.25.12.23.36/Maildir/
At which point, the original mail appeared in the user's inbox
Mailbox Aliases
I make fairly heavy use of mailbox aliases - i.e. so foobarsed@example.com gets delivered into my actual inbox
IRedAdmin pro exposes a form to allow you to create these, but with prices starting at $499/year that's way, way out of my price range
Instead, we just need to make a simple script to create the aliases for us (I saved as /root/add_alias.sh)
#!/bin/bash
#
# Add Alias
# Adds an alias address for an existing mailbox

if [ "$1" == "" ] || [ "$2" == "" ]
then
    echo "Usage: $0 [alias@domain] [dest@domain]"
    exit 1
fi

alias=$1
dest=$2
destdomain=${dest#*@}
aliasdomain=${alias#*@}

cat << EOM | mysql vmail

INSERT INTO forwardings (address, forwarding,
                            domain, dest_domain,
                            is_alias, active)
                    VALUES ('$alias', '$dest',
                            '$destdomain', '$aliasdomain',
                            1, 1);

EOM
Make it executable, and then add an alias
chmod +x /root/add_alias.sh
/root/add_alias.sh foobarsed@example.com ben@example.com