Volvo S60: Lower Control arm and Balljoint Replacement
After nearly 240,000 miles the rubbers on my lower control arm (or wishbone) were perished, and the lower balljoint (LBJ) was starting to feel questionable too.
This procedure is to replace both on the left hand side (i.e. Gearbox end of the engine). The procedure for the right hand side (i.e. Cambelt end) is almost exactly the same, but with one (fairly large caveat) - to access the front-mount bolts on the right hand side, you will need to raise that end of the engine by about 25mm. You can get away without this if you're very lucky (or have extremely shallow sockets) but for that side of the car, plan as if you're going to have to raise the engine slightly so that your ratchet doesn't foul on the sump.
Also, if you're doing the right hand side (offside), be very careful of the driveshaft - it's incredibly easy to accidentally pull the shaft out of the inner CV joint - if you do this you'll need to replace the driveshaft. It's a common occurrence when changing the offside control arm on the S60 and V70 apparently
I was in a bit of a hurry doing this job, and unfortunately forgot to take pictures. The pictures below were all taken after the fact.
Equipment
You're going to need a range of equipment, at least one of which may not already be in your toolbox.
- Sockets in a range of sizes
- Flat spanners help make life easier
- Balljoint seperator (fork type works better than push type)
- 2 small flathead screwdrivers
- Lump Hammer
- Thick ratchet strap (to help pull the wishbone down during re-assembly)
- A slide hammer would be advantageous, but can be done without
- Impact gun
- Set of Allan and Torx keys
- New Lower Control Arm
- New Balljoint
- New LCA mounting bolts (strongly recommended)
The ratchet strap, whilst odd, is almost indispensable as it'll help ensure no-one loses their fingers. At a push you can substitute that for a second person, but it's a riskier option (ideally, you want both).
When ordering the Lower Control Arm, you will likely find there are two possible options. One is aluminium, the other is ferrous. Mine takes the aluminium version, but the way to tell is to look at the current one. If there's a huge hole through the middle of it (huge being, could almost put many fingers through) then you need the ferrous one. If it's solid (sometimes with a small hole drilled through) then you need the Aluminium one.
Get it right though, it's frustrating when you realise too late!
Get the car in the air
The first step is to get the car in the air and remove the wheels. Ramps obviously aren't an option here, so you'll need to use stands (do not simply leave the car on a jack). As the LCA will be removed, you cannot place the stands anywhere inside the arches - I chose to jack from the jacking points near the middle of the car, and then placed the stands where the subframe meets the rest of the chassis just behind the engine bay.
Once in the air, get the wheels off.
Procedure
With the wheel off and safely out of the way, undo the bolt securing the tie-rod end to the stub-axle assembly and then disconnect it (it uses a small balljoint, but a gentle tap on the pin with a hammer is usually sufficient to free it).
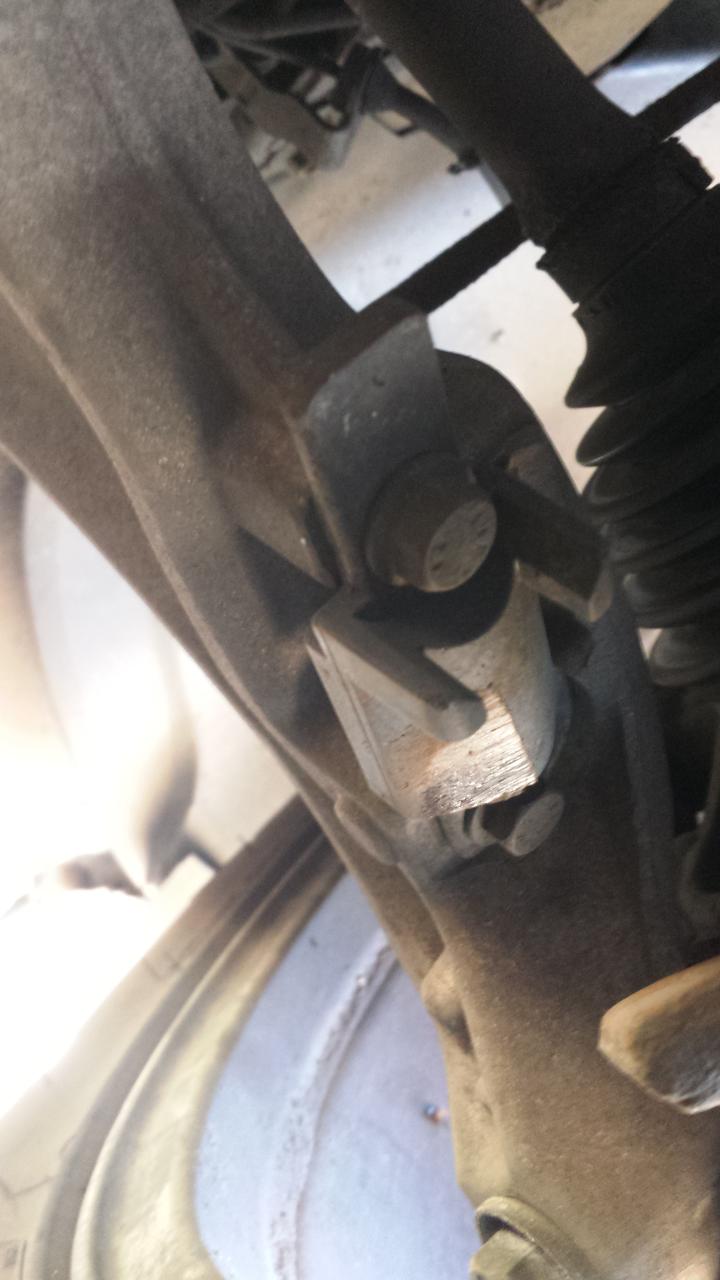
The next job is to undo the balljoint retaining nut. This is much easier if you have an impact gun, as it turns quickly enough to undo the nut without turning the balljoint itself. If not, you'll need to use either an allen key or a torx (depending on your balljoint) to hold the centre whilst you undo the nut with a ratchet spanner.
Once the nut is removed, hammer the balljoint splitter in between the LCA and the balljoint to split the LBJ.
If you lean on the LCA it should now move downwards slightly without pulling the stub-axle assembly down with it.
The next thing to do is to remove the Lower Control Arm so that it's out of the way while we work on the balljoint. If you're only planning on replacing the balljoint you can skip this but it means the LCA will sometimes get in your way.
Lower Control Arm Removal
There are 3 (big) bolts holding the LCA in place - two on the front mount and one through the rear mount.
The two front mount bolts pass through the subframe (from the engine bay) and out into the LCAs threads, so you'll need to crawl under the car to access them. They should be quite tight, but a long bar should be sufficient to crack them (if you're working on the RH side of the car, these are the nuts you might need to lift the engine to access):

Don't fully remove them yet, just loosen them off enough that you're happy they're turning.
The rear mount bolt passes up through the subframe, through the rear mount and into a large nut.

You'll need to get a flat spanner onto the nut in order to stop it from turning and then use a long wrench to turn the bottom. Completely remove the bolt and put it and the nut somewhere safe (though, by the book, you should replace with new).
Now, you can remove the front mount bolts completely and set to one side. The front of the LCA will drop slightly when you do this so make sure you've not got your knees up under it!
By holding the LCA level, you should now be able to pull and remove it. The rear mount sometimes sticks slightly so may require a bit of wiggling.
Put the LCA down out of the way.
Balljoint Replacement
Depending, primarily on luck, this is either really straightforward or will take quite some time.
The base of the balljoint is splined and is pressed into the bottom of the stub-axle carrier. The stub-axle carrier is aluminium, so as it's quite soft you need to be careful not to damage it.
If you've got a slide hammer (or can get one) this is far more straightforward. If not, you'll need to carefully work it out with a couple of flathead screwdrivers.
Either way, the first step is to remove the two balljoint retaining bolts from the base of the stub-axle. These tend to come out quite easily.
Once that's done, it's time to remove the balljoint:
If you've got a slide-hammer, attach it to the end of the balljoint and have at it until the balljoint comes out.
If not, then start (gently) trying to tap a flat-head in between the edge of the balljoint and the bottom of the stub-axle carrier. The easiest place to start is normally at the end (near where the bolts go through), but you need to work around the edge to make sure it comes evenly. Time and patience is key here.
Once you've advanced it a bit, you should find you can knock a screwdriver through under each of the balljoint's retaining wings to help pull it down.
Continue working it out until it's finally free.
The next step, inevitably, is to get the new balljoint in. You need to achieve this without damaging it (obviously).
Some people use a short length of 3" pipe to help hammer it in, but there's still a risk of damaging the rubbers with that approach, so it's better to do the following:
- Hand push the new balljoint in a little way, making sure it's properly aligned (as it's splined, you're not going to be able to turn it to correct)
- Put the new balljoint retaining bolts through and give them a couple of turns (until they're tight to the balljoint).
- Use a hammer and a small flathead to knock one side in slightly. Tighten the bolt on that side down until it's reasonably tight against the balljoint wing.
- Now knock the other side in slightly, and then tighten the nut on that side in the same manner
- Repeat, alternating between sides until it's all the way in (takes a little time, but is fairly easy)
Torque the bolts up, and this stage should now be done.
Lower Control Arm Installation
You're now ready to put the new control arm in place.
The initial stage is reasonably easy. Hold the front mount in place, and finger tighten the retaining bolts so that they turn a little way into the threads (at this stage we want it loose with a lot of movement).
Now line up the rear mount and push it into place, sliding the retaining bolt through once it's positioned.
Tighten up the rear mounting bolt first, then tighten the front mount bolts and torque everything up.
This is where the challenge begins, you've now got to overcome the strength of brand-spanking-new rubber bushings in order to pop the balljoint back in. Remember the stresses they're designed to cope with before putting your fingers anywhere where they may compete with the bushings for strength.
The easiest way to do this, is to use your ratchet strap. Hook the far hook across the subframe on the other side of the car (aligned, more or less, with the middle of that control arm).
Then hook the other end onto the new control arm, as close to the balljoint point as possible (but not in it, or obscuring it!).
Start tightening the strap to pull the LCA down, making sure that you're not at risk if the strap suddenly pings loose. Pull the arm down until there's sufficient clearance for you to move the end of the balljoint over the cup (and just slightly into it's hole).
Once you're aligned, release the ratchet strap - the tension on the LCA will pop the balljoint into position.
Finishing Up
Put the balljoint's nut back on and torque appropriately
Re-attach the tie-rod end, and torque appropriately
Before you put the wheel back on, you also need to remove the steering stop from the old wishbone and screw it into place on the replacement:
Do one last check that all nuts have been re-installed and correctly torqued (and that you've not left any tools in there), put the wheel back on and put the car back on the ground.