Building and running your own DNS-over-HTTPS Server
There's been a fair bit of controversy over DNS-over-HTTPS (DoH) vs DNS-over-TLS (DoT), and some of those arguments still rage on.
But, DoH isn't currently going anywhere, and Firefox has directly implemented support (though it calls them Trusted Recursive Resolvers or TRR for short).
Although DoH offers some fairly serious advantages when out and about (preventing blocking or tampering of DNS lookups by network operators), when left with default configuration it does currently come with some new privacy concerns of it's own. Do you really want all your DNS queries going via Cloudflare? Do you want them to be able to (roughly) tell when your mobile device is home, and when it's out and about (and potentially, also your employer - if they own the netblock)? The same questions of course go if you use Google's DNS too.
That, however, is addressable by running your own DNS-over-HTTPS server. This also has advantages if you're trying to do split-horizon DNS on your LAN, so I'll discuss that later too.
The primary purpose of this documentation is to detail how to set up your own DoH server on Linux. The main block of this documentation is concerned with getting a NGinx fronted DoH server backed by Unbound up and running, but will also discuss the steps needed to add Pi-Hole into the mix.
Unless otherwise noted, all commands are run as root
Overview
This documentation may look like the setup is a lot of work, but the basic setup is actually reasonably straight forward and simple. I've covered a number of potential additional options in this documentation (and as you can see from my tinkering in MISC-27 just barely scratched the surface).
Once complete, our basic setup will be:
- Nginx (handling SSL)
- DoH-Server (translating Wireformat between HTTP and UDP)
- Unbound (handling adblocking and name resolution)
Further down the page, you'll find some additional references
- Using Pihole instead of Unbound
- Using Pihole as well as Unbound
- Client Setup steps
- Notes on handling Split-Horizon DNS with DoH
- Additional Access control approaches
Basic Setup
Hardware
I built this system using Digitalocean's smallest droplet size:
- 1GB RAM
- 1 CPU
- 25GB root disk (only currently actually using 2.3GB of this).
- Running Debian 9.7
It runs happily enough, but would probably benefit from additional cores and RAM. In principle there isn't any real reason you couldn't build this on a raspberry pi if needed
Installing the DoH Server Software
The first thing we're going to do is install some software to translate DNS over HTTPS requests into ordinary DNS requests.
apt-get update
apt-get install curl software-properties-common build-essential git
mkdir build
cd build

# Need Go >= 1.10 to build DoH server
# so fetch latest
wget https://dl.google.com/go/go1.12.2.linux-amd64.tar.gz
tar xzf go1.12.2.linux-amd64.tar.gz
mv go /usr/local/
export GOROOT=/usr/local/go
export PATH=$GOPATH/bin:$GOROOT/bin:$PATH
go version # verify it's working


# Now we fetch and compile the DoH server
mkdir ~/gopath
export GOPATH=~/gopath
wget https://github.com/m13253/dns-over-https/archive/v2.0.1.tar.gz
tar xzf v2.0.1.tar.gz
cd dns-over-https-2.0.1/
make
make install
Next we're going to write out the config for that server. It won't currently work as we've not installed the other components yet
cat << EOM > /etc/dns-over-https/doh-server.conf
# HTTP listen port
listen = [
    "127.0.0.1:8053",
    "[::1]:8053",

]

# TLS certification file
# If left empty, plain-text HTTP will be used.
# You are recommended to leave empty and to use a server load balancer (e.g.
# Caddy, Nginx) and set up TLS there, because this program does not do OCSP
# Stapling, which is necessary for client bootstrapping in a network
# environment with completely no traditional DNS service.
cert = ""

# TLS private key file
key = ""

# HTTP path for resolve application
path = "/dns-query"

# Upstream DNS resolver
# If multiple servers are specified, a random one will be chosen each time.
upstream = [
    "127.0.0.1:5353"
]

# Upstream timeout
timeout = 10

# Number of tries if upstream DNS fails
tries = 3

# Only use TCP for DNS query
tcp_only = false

# Enable logging
verbose = false

# Enable log IP from HTTPS-reverse proxy header: X-Forwarded-For or X-Real-IP
# Note: http uri/useragent log cannot be controlled by this config
log_guessed_client_ip = false

EOM

systemctl restart doh-server
systemctl status doh-server
Installing Nginx
Next we need to get Nginx up and running as that'll be handling SSL termination and logging for us
apt-get install gnupg2 ca-certificates lsb-release
echo "deb http://nginx.org/packages/debian `lsb_release -cs` nginx" >> /etc/apt/sources.list.d/nginx.list
curl -fsSL https://nginx.org/keys/nginx_signing.key | apt-key add -
apt-key fingerprint ABF5BD827BD9BF62
apt-get update
apt-get -y install nginx


# We're going to set rate limits just in case the public gain access
# This sets 300 requests a second
cat << EOM > /etc/nginx/conf.d/00-rate-limits.conf
limit_req_zone \$binary_remote_addr zone=doh_limit:10m rate=300r/s;
EOM

# Create the config - remember to replace server_name with whatever name you are using
cat << EOM > /etc/nginx/conf.d/doh.conf
upstream dns-backend {
    server 127.0.0.1:8053;
    keepalive 30;
}
server {
        listen 80;
        server_name dns.bentasker.co.uk;
        root /tmp/NOEXIST;
        location /dns-query {
                limit_req zone=doh_limit burst=50 nodelay;
                proxy_set_header X-Real-IP \$remote_addr;
                proxy_set_header X-Forwarded-For \$proxy_add_x_forwarded_for;
                proxy_set_header Host \$http_host;
                proxy_set_header X-NginX-Proxy true;
                proxy_http_version 1.1;
                proxy_set_header Upgrade \$http_upgrade;
                proxy_set_header Connection "";
                proxy_redirect off;
                proxy_set_header        X-Forwarded-Proto \$scheme;
                proxy_read_timeout 86400;
                proxy_pass http://dns-backend/dns-query;
        }


        location / {
            return 404;
        }


}
EOM

systemctl restart nginx
Verify it's started
root@debian-9-doh-newbuild:~/build/dns-over-https-2.0.1# netstat -lnp | grep 80
tcp        0      0 0.0.0.0:80              0.0.0.0:*               LISTEN      4890/nginx: master
tcp        0      0 127.0.0.1:8053          0.0.0.0:*               LISTEN      4029/doh-server
tcp6       0      0 ::1:8053                :::*                    LISTEN      4029/doh-server
udp6       0      0 fe80::343e:5bff:fee:123 :::*                                834/ntpd
So now we want to set up the SSL. We're going to use LetsEncrypt to obtain a valid certificate for our server, so make sure whatever DNS name you want to use for your service (in my case dns.bentasker.co.uk) resolves back to the server
cat << EOM > /etc/nginx/conf.d/00-cert-stapling.conf
ssl_stapling on;
ssl_stapling_verify on;
resolver 127.0.0.1:5353;
EOM

apt-get install certbot python-certbot-nginx
certbot --nginx -d dns.bentasker.co.uk
Agree to all the terms and then when prompted, choose redirect
Certbot's default SSL options can are a little over liberal though, so overwrite them with some more conservative values
cat << EOM > /etc/letsencrypt/options-ssl-nginx.conf
ssl_session_cache shared:le_nginx_SSL:1m;
ssl_session_timeout 1440m;

ssl_protocols TLSv1.1 TLSv1.2 TLSv1.3;
ssl_prefer_server_ciphers on;

ssl_ciphers 'ECDHE-ECDSA-AES256-GCM-SHA384:ECDHE-RSA-AES256-GCM-SHA384:ECDHE-ECDSA-CHACHA20-POLY1305:ECDHE-RSA-CHACHA20-POLY1305:ECDHE-ECDSA-AES128-GCM-SHA256:ECDHE-RSA-AES128-GCM-SHA256:ECDHE-ECDSA-AES256-SHA384:ECDHE-RSA-AES256-SHA384:ECDHE-ECDSA-AES128-SHA256:ECDHE-RSA-AES128-SHA256';
add_header Strict-Transport-Security "max-age=31536000;" always;
EOM

systemctl restart nginx
Nginx should now be listening on port 443
root@debian-9-doh-newbuild:~/build/dns-over-https-2.0.1# netstat -lnp | grep nginx
tcp        0      0 0.0.0.0:80              0.0.0.0:*               LISTEN      5466/nginx: master
tcp        0      0 0.0.0.0:443             0.0.0.0:*               LISTEN      5466/nginx: master
Now we just want to edit our Nginx config to enable HTTP/2 (add it to the listen line)
cat /etc/nginx/conf.d/doh.confupstream dns-backend { server 127.0.0.1:8053; keepalive 30; } server { server_name dns.bentasker.co.uk; root /tmp/NOEXIST; location /dns-query { proxy_set_header X-Real-IP $remote_addr; proxy_set_header X-Forwarded-For $proxy_add_x_forwarded_for; proxy_set_header Host $http_host; proxy_set_header X-NginX-Proxy true; proxy_set_header Connection ""; proxy_http_version 1.1; proxy_set_header Upgrade $http_upgrade; proxy_redirect off; proxy_set_header X-Forwarded-Proto $scheme; proxy_read_timeout 86400; proxy_pass http://dns-backend/dns-query; } location / { return 404; } listen 443 ssl http2; # managed by Certbot ssl_certificate /etc/letsencrypt/live/dns.bentasker.co.uk/fullchain.pem; # managed by Certbot ssl_certificate_key /etc/letsencrypt/live/dns.bentasker.co.uk/privkey.pem; # managed by Certbot }
Unbound Setup
Our next step, then, is to get Unbound installed and up and running.
There are two ways to go about this depending on whether your want EDNS Client Subnet (ECS) data to be sent to authoritative resolvers or not. If you don't, then you can simply install a package, but CDN's will route you to a PoP most suitable for the location of your DoH server and not for the location of whatever client you're using.
With ECS enabled, the server will include your subnet in upstream queries (so if your client device has public IP 1.2.3.4 the DNS server will include a field to state you're in 1.2.3.0/24 so that routing systems can return a result appropriate to that location/address).
My preference is to use a version which can enable ECS, but this does mean fetching and compiling Unbound, as the version in Debian's repo has been packaged without ECS support.
Either way, we're first going to firewall the ports so that random netizens do not try and exploit our default-settings unbound whilst we're setting it up
iptables -I INPUT -p tcp --dport 53 -j REJECT
iptables -I INPUT -p udp --dport 53 -j REJECT
iptables -I INPUT -i lo -j ACCEPT
ip6tables -I INPUT -p tcp --dport 53 -j REJECT
ip6tables -I INPUT -p udp --dport 53 -j REJECT
ip6tables -I INPUT -i lo -j ACCEPT
Packaged Unbound
If you're happy to forsake ECS support do the following
apt-get install unbound
However, in the instructions that follow, you'll also need to replace /usr/local/etc/unbound with /etc/unbound wherever it occurs (or you can be lazy and do ln -s /etc/unbound /usr/local/etc
Compiled Unbound
Do the following to get unbound install and in place
apt-get install libssl-dev libexpat1-dev
cd ~/build
wget http://www.unbound.net/downloads/unbound-latest.tar.gz
tar xzf unbound-latest.tar.gz
cd unbound-1.9.1/
./configure --enable-subnet
make
make install

ln -s /usr/local/etc/unbound/ /etc/unbound
ldconfig

useradd -r unbound
mkdir /usr/local/etc/unbound/trust
mkdir /usr/local/etc/unbound/local.d
mkdir /usr/local/etc/unbound/unbound.conf.d
chown unbound /usr/local/etc/unbound/trust

sudo -u unbound unbound-control-setup -d /usr/local/etc/unbound/trust/
sudo -u unbound unbound-anchor -a /usr/local/etc/unbound/trust/root.key

cat << EOM > /lib/systemd/system/unbound.service
[Unit]
Description=Unbound DNS server
Documentation=man:unbound(8)
After=network.target
Before=nss-lookup.target
Wants=nss-lookup.target

[Service]
Type=simple
Restart=on-failure
EnvironmentFile=-/etc/default/unbound
ExecStartPre=/usr/local/sbin/unbound-anchor -a /usr/local/etc/unbound/trust/root.key
ExecStart=/usr/local/sbin/unbound -c /usr/local/etc/unbound/unbound.conf -d \$DAEMON_OPTS
ExecReload=/usr/local/sbin/unbound-control reload

[Install]
WantedBy=multi-user.target
EOM

systemctl daemon-reload
Configuring Unbound
However you installed unbound, the next step is to configure it. We're going to bind it to loopback (and a custom port at that) and we're going to allow it to pull in some additional config files so we can maintain adblock lists
cat << EOM > /usr/local/etc/unbound/unbound.conf
server:
    module-config: "subnetcache validator iterator"
    chroot: "/usr/local/etc/unbound"
    directory: "/usr/local/etc/unbound"
    username: "unbound"

    interface: 127.0.0.1
    port: 5353
    do-daemonize: yes
    verbosity: 1

    # Enable UDP, "yes" or "no".
    do-udp: yes

    # Enable TCP, "yes" or "no".
    do-tcp: yes

    auto-trust-anchor-file: "/usr/local/etc/unbound/trust/root.key"

    # ECS support
    client-subnet-zone: "."
    client-subnet-always-forward: yes
    max-client-subnet-ipv4: 24
    max-client-subnet-ipv6: 48


    # Randomise case to make poisioning harder
    use-caps-for-id: yes

    # Minimise QNAMEs
    qname-minimisation: yes

    harden-below-nxdomain: yes


    # This is where we'll put our adblock config
    include: local.d/*.conf

include: unbound.conf.d/*.conf

remote-control:
    control-enable: yes
    control-interface: 127.0.0.1
    control-port: 8953
    server-key-file: "/usr/local/etc/unbound/trust/unbound_server.key"
    server-cert-file: "/usr/local/etc/unbound/trust/unbound_server.pem"
    control-key-file: "/usr/local/etc/unbound/trust/unbound_control.key"
    control-cert-file: "/usr/local/etc/unbound/trust/unbound_control.pem"

EOM
If you want to just forward queries rather than have unbound resolve them itself, you can do this
# Don't do this unless you've read the previous sentence!
cat << EOM > /usr/local/etc/unbound/unbound.conf.d/forwarders.conf
forward-zone:
        name: "."
        forward-addr: 8.8.8.8
        forward-addr: 8.8.4.4
EOM
Now start Unbound and it should be bound to loopback on port 5353
systemctl start unbound

root@debian-9-doh-newbuild:/usr/local/etc/unbound# netstat -lnp | grep unboun
tcp        0      0 127.0.0.1:5353          0.0.0.0:*               LISTEN      16753/unbound
udp        0      0 127.0.0.1:5353          0.0.0.0:*                           16753/unbound
At this point, we _should_ be able to place requests via our setup
root@debian-9-doh-newbuild:/usr/local/etc/unbound# curl -s "https://dns.bentasker.co.uk/dns-query?name=projects.bentasker.co.uk&type=A" | python -m json.tool
{
    "AD": false,
    "Answer": [
        {
            "Expires": "Wed, 01 May 2019 11:05:14 UTC",
            "TTL": 3600,
            "data": "projects.balanced.bentasker.co.uk.",
            "name": "projects.bentasker.co.uk.",
            "type": 5
        },
        {
            "Expires": "Wed, 01 May 2019 10:05:44 UTC",
            "TTL": 30,
            "data": "51.255.232.237",
            "name": "projects.balanced.bentasker.co.uk.",
            "type": 1
        }
    ],
    "CD": false,
    "Question": [
        {
            "name": "projects.bentasker.co.uk.",
            "type": 1
        }
    ],
    "RA": true,
    "RD": true,
    "Status": 0,
    "TC": false,
    "edns_client_subnet": "134.209.27.0/24"
}
Adblock setup
Now we want to set up an auto-pull of a list of adblocked domains so that Unbound will return 127.0.0.1 for those.
Set up a cron to periodically refresh the list:
curl -o /root/update_ads.sh https://www.bentasker.co.uk/adblock/static/update_ads.sh
chmod +x /root/update_ads.sh
echo "0 0 * * *    root    /root/update_ads.sh" > /etc/cron.d/ad_domains_update
Now go and manually populate an instance of the list
cd /usr/local/etc/unbound/local.d/
curl -o adblock.new "https://www.bentasker.co.uk/adblock/autolist.txt"
mv adblock.new adblock.conf
systemctl restart unbound
curl -s "https://dns.bentasker.co.uk/dns-query?name=google-analytics.com&type=A" | python -m json.tool # Should give an IP of 127.0.0.1
Firewall Rules
Although things should be relatively safely set up, we still obviously want to put some firewall rules in place as a first line of defence against accidental misconfigurations
iptables -F INPUT
iptables -A INPUT -m state --state RELATED,ESTABLISHED -j ACCEPT
iptables -A INPUT -i lo -s 127.0.0.0/8 -j ACCEPT
iptables -A INPUT -p tcp --dport 443 -j ACCEPT
iptables -A INPUT -p tcp --dport 80 -j ACCEPT
iptables -A INPUT -p tcp --dport 22 -j ACCEPT
iptables -A INPUT -j REJECT
ip6tables -F INPUT
ip6tables -A INPUT -m state --state RELATED,ESTABLISHED -j ACCEPT
ip6tables -A INPUT -i lo -s ::1 -j ACCEPT
ip6tables -A INPUT -p tcp --dport 443 -j ACCEPT
ip6tables -A INPUT -p tcp --dport 80 -j ACCEPT
ip6tables -A INPUT -p tcp --dport 22 -j ACCEPT
ip6tables -A INPUT -j REJECT
apt-get -y install iptables-persistent
iptables-save > /etc/iptables/rules.v4
ip6tables-save > /etc/iptables/rules.v6
And we're done!
Pi-Hole
It wasn't my original aim to use Pi-hole, but given it's huge popularity it'd be remiss not to document how to use it instead of (and as well as) Unbound. If you're planning on using it instead of unbound then skip that step (or if you've already done it, sorry. Just stop and disable unbound)
Now lets install pi-hole
curl -sSL https://install.pi-hole.net | bash
When prompted, do not install Pi-hole default firewall rules, make a note of the admin password when it's provided
Once the installer's complete, we need to reconfigure lighttpd to bind to a different port
vi /etc/lighttpd/lighttpd.conf#change server.port to 8080systemctl start lighttpdroot@debian-9-doh-newbuild:~# netstat -lnp | grep light tcp 0 0 0.0.0.0:8080 0.0.0.0:* LISTEN 27041/lighttpd tcp6 0 0 :::8080 :::* LISTEN 27041/lighttpd unix 2 [ ACC ] STREAM LISTENING 291926 27053/php-cgi /var/run/lighttpd/php.socket-0
Edit the DNS-over-HTTPS server config to change the upstream
vi /etc/dns-over-https/doh-server.confupstream = [ "127.0.0.1:53" ]systemctl restart doh-server
We're going to tell pihole to only bind it's DNS service to loopback, as we don't want accidents with the firewall to lead to us running an open UDP resolver
cat << EOM > /etc/dnsmasq.d/99-mysettings.conf
listen-address=::1,127.0.0.1
bind-interfaces
EOM

systemctl restart pihole-FTL
We'll overwrite our cert stapling config for NGinx to point it towards pihole
cat << EOM > /etc/nginx/conf.d/00-cert-stapling.conf
ssl_stapling on;
ssl_stapling_verify on;
resolver 127.0.0.1:53;
EOM
And create basic NGinx config so we can proxy through to Pihole's web interface (I strongly recommend you add additional authentication to this basic example). Remember to replace dnsadmin.bentasker.co.uk with your own domain
cat doh-admin.confserver { server_name dnsadmin.bentasker.co.uk; root /tmp/NOEXIST; #In production, definitely want to add some auth to this location /admin/ { proxy_set_header X-Real-IP $remote_addr; proxy_set_header X-Forwarded-For $proxy_add_x_forwarded_for; proxy_set_header Host $http_host; proxy_set_header X-NginX-Proxy true; proxy_http_version 1.1; proxy_set_header Upgrade $http_upgrade; proxy_redirect off; proxy_set_header X-Forwarded-Proto $scheme; proxy_read_timeout 86400; proxy_pass http://127.0.0.1:8080; } listen 443 ssl http2; # managed by Certbot ssl_certificate /etc/letsencrypt/live/dnsadmin.bentasker.co.uk/fullchain.pem; # managed by Certbot ssl_certificate_key /etc/letsencrypt/live/dnsadmin.bentasker.co.uk/privkey.pem; # managed by Certbot }systemctl restart nginx
You should now be able to login to the admin page at https://dnsadmin.bentasker.co.uk/admin and see reports on how your queries have been handled.
If you want to add my adblocking list to Pihole, you can do this through Pihole's interface - (Login -> Settings -> Blocklists) - adding the list https://www.bentasker.co.uk/adblock/blockeddomains.txt
I'd also strongly recommend adding some protection against Phishing domains by adding the lists provided at Phishing Army
You should also consider configuring Pi-Hole to update it's blocking lists more regularly.
If your intention was to run Pihole instead of unbound, it's now done.
Running Unbound Alongside
If you still wanted to use unbound behind pihole, then there are a few additional steps. We need to rebind unbound to 127.0.1.1:53 (the reason being pihole won't seem to allow us to specify an additional port - you should be able to use a #, but it rejected mine)
Edit /usr/local/etc/unbound/unbound.conf and adjust the config so that the following are set
    interface: 127.0.1.1
    port: 53
Then restart unbound
systemctl restart unbound
Now in Pihole's admin page, we can set an upstream resolver (Login -> Settings -> DNS) by unticking the existing options and adding 127.0.1.1 into custom1

At this point it should all just work (Pihole forwards through the ECS data that doh-server passes into it.
Client Setup
Firefox
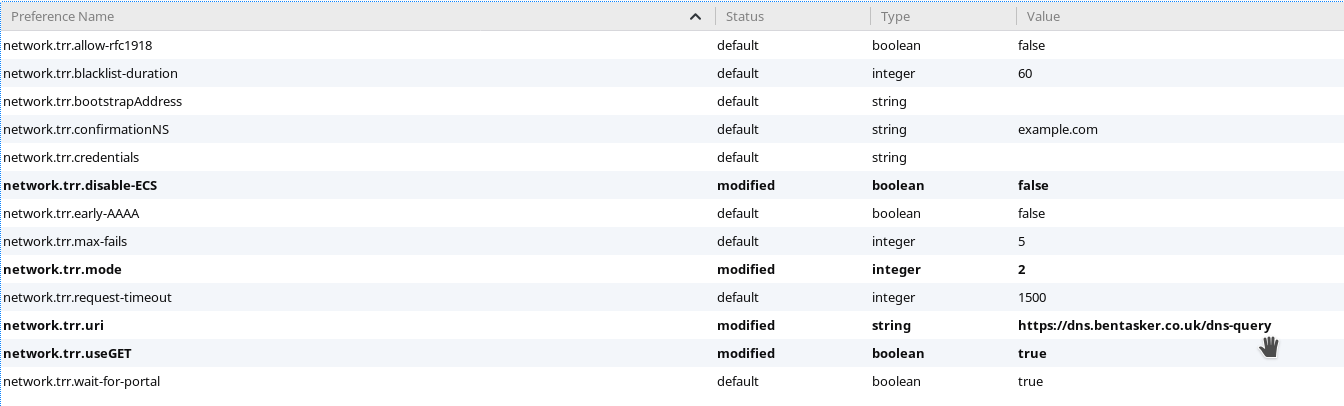
It's possible to set up Firefox to perform queries itself by pointing it's Trusted Recursive Resolver (TRR) config to your server. Go to about:config Set (replace with your domain):
- network.trr.uri to https://dns.bentasker.co.uk/dns-query
- network.trr.mode 2
- network.trr.disable-ECS false
OS Level - Android
Go to Google's Play store and download Intra. It's released by Google's sister company Jigsaw and acts as a VPN interface in order to intercept DNS queries
- Open Intra
- Go into Settings and choose "Select DNS over HTTPS Server"
- Choose custom server URL
- enter https://dns.bentasker.co.uk/dns-query

OS Level - Linux
There are other solutions such as cloudflared but I opted just to use the client portion of the codebase we deployed onto our DoH server
wget https://dl.google.com/go/go1.12.2.linux-amd64.tar.gz
tar xvf go1.12.2.linux-amd64.tar.gz
sudo mv go /usr/local/
export GOROOT=/usr/local/go
export PATH=$GOPATH/bin:$GOROOT/bin:$PATH
wget https://github.com/m13253/dns-over-https/archive/v2.0.1.tar.gz
tar xzf v2.0.1.tar.gz
mkdir ~/gopath
export GOPATH=~/gopath
make
sudo make install

sudo vi /etc/dns-over-https/doh-client.conf

Change the URL under [[upstream.upstream_ietf]] to "https://dns.bentasker.co.uk/dns-query":

[[upstream.upstream_ietf]]
	url = "https://dns.bentasker.co.uk/dns-query"
	weight = 100

systemctl enable doh-client.service
systemctl start doh-client.service
netstat -lnp | grep 53

dig @127.0.0.1 projects.bentasker.co.uk
If you're using NetworkManager, override the DNS in it's config for your connection
# Add Under the [ipv4] section:
ignore-auto-dns=true
dns=127.0.0.1;
Otherwise, just drop it into resolv.conf
echo nameserver 127.0.0.1 | sudo tee /etc/resolv.conf
Mac OX X
Install cloudflared and reconfigure it to use your own server
brew install cloudflare/cloudflare/cloudflared vi /usr/local/etc/cloudflared/config.yamlproxy-dns: true proxy-dns-upstream: - https://dns.bentasker.co.uk/dns-querysudo cloudflared service install
Go to System Preferences->Network->Advanced->DNS and set DNS to 127.0.0.1
Windows
Much like with OS X install Cloudflared as described here and then reconfigure to use your server instead
Additional Notes
Split Horizon DNS
One of the reasons for doing this may be that you want to use DoH on mobile devices (such as yourp phone and laptop) so that your queries aren't interfered with by network operators when out and about, but don't want to need to remember to toggle it off when you get home and want to resolve local domains (Note: alternatively, if you configure Firefox with network.trr.mode 2 it'll automatically fall back to the OS configured resolver if it cannot resolve a name, so LAN names will still resolve if you haven't also configured the OS to use DoH. The downside of that is that apps etc don't get the DoH protection).
If it's your intention to do that, then you'll want to essentially end up with two DoH servers, one that's in publicly routable address space (so that your devices can reach it when out and about) and one on the LAN, carrying LAN specific records/overrides. You'd then use traditional split-horizon DNS on the name to send LAN clients to the LAN DoH server, and out-and-about devices to the main one.
Note that you don't necessarily need to run a full-fat DoH server on your public instance, and could instead proxy through to cloudflare or Google:
server {
        server_name dns.bentasker.co.uk;
        root /tmp/NOEXIST;
        location /dns-query {
                proxy_set_header X-Real-IP $remote_addr;
                proxy_set_header X-Forwarded-For $proxy_add_x_forwarded_for;
                proxy_set_header Host 1.1.1.1;
                proxy_http_version 1.1;
                proxy_set_header Upgrade $http_upgrade;
                proxy_redirect off;
                proxy_read_timeout 86400;
                proxy_pass https://1.1.1.1/dns-query;
        }


        location / {
            return 404;
        }

    listen 443 ssl http2; # managed by Certbot
    ssl_certificate /etc/pki/cert/cert.pem;
    ssl_certificate_key /etc/pki/private/cert.key;
}
You will need a fuller-fat version on the LAN though so that you can configure overrides - though you could configure the DoH-server daemon to forward onto your LAN DNS server rather than having a new unbound instance - so it needn't be full fat
Tor
I did experiment with exposing the resolver via Tor (so that exit bandwidth could be saved etc).
However, Firefox doesn't appear to honour RFC-7838 alt-svc headers received along with DoH responses, so cannot be directed to use an Onion for transport instead. Tor Browser Bundle doesn't either, but that's not unexpected.
Some clients can be configured to use plain HTTP instead of HTTPS, however resolves then happen quite slowly due to the unavailability of HTTP/2. Intra on android, however, (correctly, IMO) will not accept a HTTP URI.
So it's not that it can't be done, just that you either need to accept some trade-offs in client availability, or need to be able to afford a cert for an Onion.
Running a public resolver
One of the biggest risks of running a publicly available DNS server is automatically mitigated by DNS-over-HTTPS: that of Reflection based attacks.
Because HTTPS requries TCP to function, it's no longer possible for an attacker to send a DNS query with a spoofed address in order to have an unsolicited and large response sent to the victim.
However, just because the DRDOS risk is mitigated, it would be unwise to assume it's automatically now OK to run an open DoH resolver. There are a wide variety of other potential issues that should be considered, although eagle eyed visitors will note that our Unbound config did enable mitigation for things like cache poisoning attacks, and that our Nginx config introduced rate limits at the HTTP level.
Whilst, at first glance, it might seem like this config should be safe as an Open Resolver, my advice would still be not to run one. At least not until you've done far more reading into the nuances and requirements of running open resolvers than I have. You should start with Current Best Practices.
Authentication and Access Control
Firefox only clients
If you're simply using Firefox's TRR, it's possible to provide it with the right-hand side of an authorisation header in network.trr.credentials. So you might do something like the following (please use a better password)
cd /etc/nginx
printf "dohuser:$(openssl passwd -crypt supersec)\n" >> .htpasswd
vi conf.d/doh.conf

# Add the following within the dns-query location statement:

satisfy any;
deny all;
auth_basic "Authentication is a must";
auth_basic_user_file /etc/nginx/.htpasswd;

service nginx reload
Then generate a string to pass to Firefox
echo "Basic `echo -n "dohuser:supersec" | base64`"
Basic ZG9odXNlcjpzdXBlcnNlYw==
Set that as the value for network.trr.credentials
Intra/DoH-client/Mixed clients
Most DoH clients do not include explicit support for authentication.
Assuming you're not able to predict what each client's IP will be at any point (otherwise, you'd just whitelist IPs), you will need to rely on a means of putting authentication tokens into the path, and reconfiguring your client to use those tokens.
That may be as simple as changing your NGinx location block
        location /mysupersecretstring/dns-query {
                proxy_set_header X-Real-IP $remote_addr;
                proxy_set_header X-Forwarded-For $proxy_add_x_forwarded_for;
                proxy_set_header Host $http_host;
                proxy_set_header X-NginX-Proxy true;
                proxy_http_version 1.1;
                proxy_set_header Upgrade $http_upgrade;
                proxy_redirect off;
                proxy_set_header        X-Forwarded-Proto $scheme;
                proxy_read_timeout 86400;
                proxy_pass http://dns-backend/dns-query;
        }

        location /dns-query {
                return 404;
        }
to frustrate bots/attackers that might test for responses under dns-query.
Or, for slightly more complex implementations (such as having a 'user' per client) you could also switch to using OpenResty so that you can use LUA to validate credentials passed in the query string. Under that scheme you'd reconfigure Intra (or whatever) to include a fixed query string containing the credentials.
DNS-over-TLS Support
Android 9 (Pie) supports DNS-over-TLS (DoT) natively, so there's some value in also enabling DoT on your server. It's just a few minutes extra work, as this documentation has already laid most of the foundations.
Conclusion
There are a variety of possible deployment options, with fairly wide variation in client feature support, so it's easy to complicate the setup (as can be seen above). However, it's relatively easy to build a simple functioning DoH server to serve your own traffic, and there's sufficient client support to cover a variety of operating systems.
Using it with Pi-Hole also means you get some nice reports showing what percentage of your traffic was blocked, query rates etc.